

These autumn decorating DIY projects range from free yard gatherings to $30 craft-store builds, and the one that fits you depends on whether you have more time or more dried beans. The olive bucket planters need drainage holes drilled through solid-bottomed metal, and the wood bead pumpkin collapses unless the beads hit 20 mm.
1. Olive Bucket Pumpkin Planters
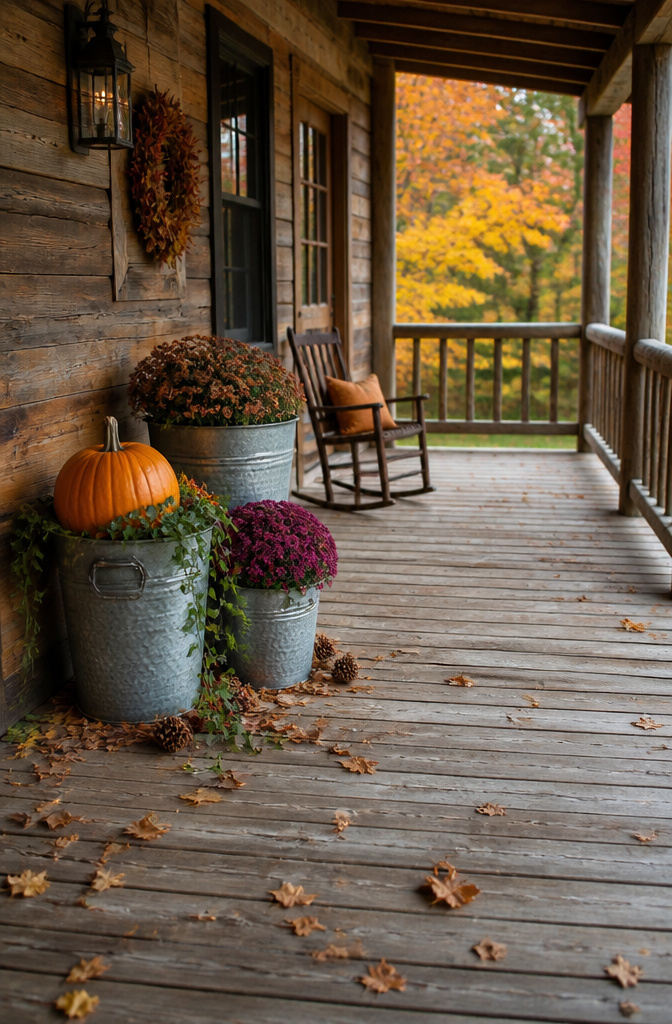
Galvanized olive buckets look like they were made for autumn porches even before you fill them. The dimpled metal and rolled rim catch afternoon light the same way old farm gear does, and they sit flat without tipping in wind that blows lighter pots off steps.
I found mine at a farm supply store for about half what garden boutiques charge online. The 10-inch size fits a single pie pumpkin or a dwarf mum without crowding, and the 14-inch swallows a full-sized pumpkin with room for trailing ivy. Farm supply stores usually stock them September through October; online prices jump once fall decorating season hits.
Drainage matters more than decoration here. These buckets come solid-bottomed, so I drill three half-inch holes and set the whole thing on a saucer or a scrap of cedar shim to keep the porch boards dry. For soil, standard potting mix works, but I add a handful of perlite because porches bake during Indian summer and the metal heats up faster than terra cotta.
Plants that last through October need cold tolerance, not just orange color. Ornamental kale, pansies, and dwarf asters handle light frost that would turn petunias to slime. The pumpkin itself stays purely decorative after a couple of weeks; once it softens, swap in a mum and the bucket keeps working until Thanksgiving.
2. Wood Bead Pumpkin
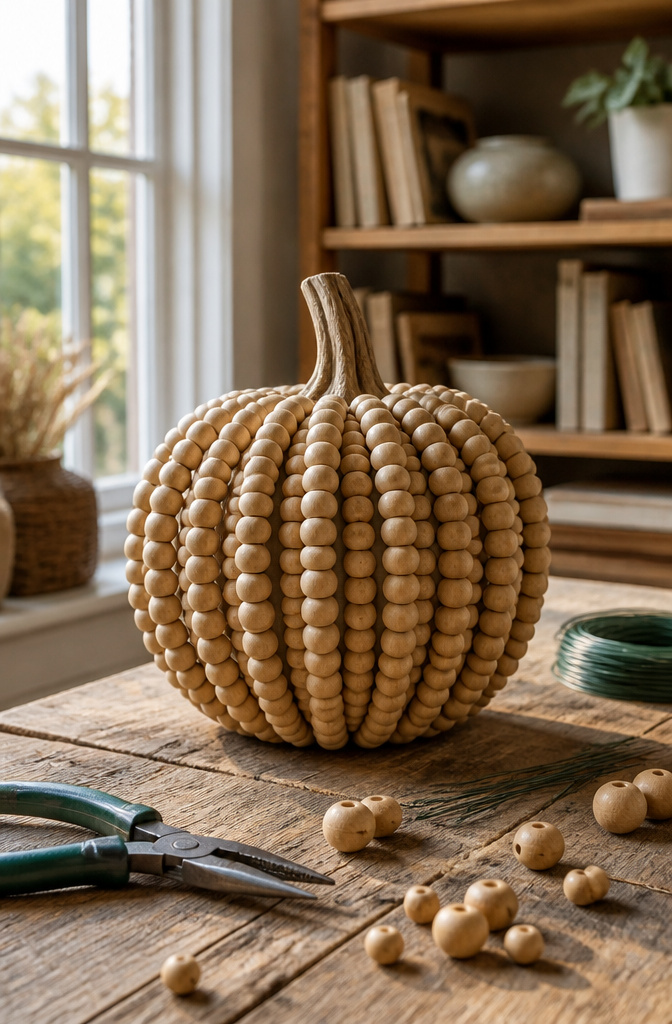
Split wood beads give this pumpkin its ridged shape without touching a knife. The beads need to be large enough to grip the wire and stay put when stacked; 20 mm is the size that actually holds together without collapsing into a heap. Anything smaller spins loose the moment you bend the frame.
Wire gauge matters more than the bead finish. I tried 18-gauge first and it snapped at the second bend, so 22-gauge floral wire bends without snapping and still pushes through the bead holes cleanly. You will thread three lengths through about thirty beads each, twist the bases into a stem, and fan the tops outward to get the round silhouette.
I bought both at a Ben Franklin Crafts in the Midwest, but any craft store with a basic wood craft section carries the same stock. Amazon works too if you check that the bead holes are pre-drilled straight; crooked holes make the pumpkin lean like a gourd after a storm.
The whole frame takes under an hour and stores flat in a shoebox until next October.
3. Leaf Bowl
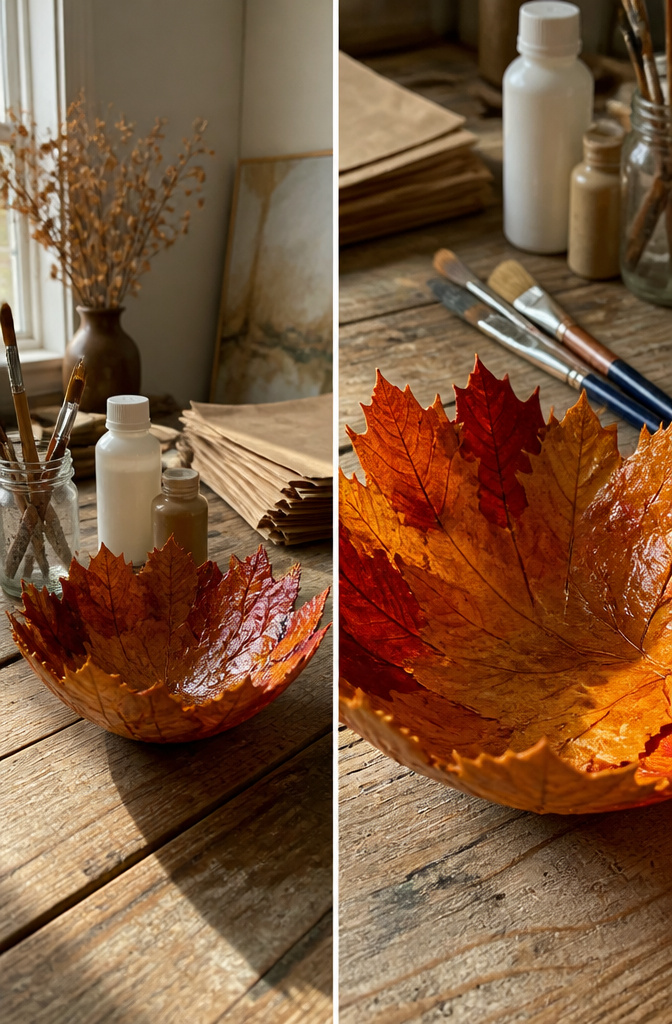
Real leaves work for this, but only the thin ones. Maple leaves dried flat in a book for a week held their shape without warping; oak leaves curled no matter how long I pressed them and cracked the first bowl I tried. The second attempt used Mod Podge, brushing three coats on a glass bowl I turned upside down as a mold. The first coat goes thin so the leaf fibers absorb it, the second builds the shell, and the third seals the overlap where leaves meet. Two coats will leave soft spots that collapse once the mold comes off. I let each layer dry overnight, which meant four days total, not the single afternoon some tutorials promise. The cracked first bowl taught me that rushing the last coat is where this project fails; the glue underneath stays damp, then shrinks and splits the seam. Faux leaves skip the pressing step entirely and cost about a dollar at the craft store, but the real ones catch afternoon light in a way the plastic ones never manage.
4. Weathered Wood Sign
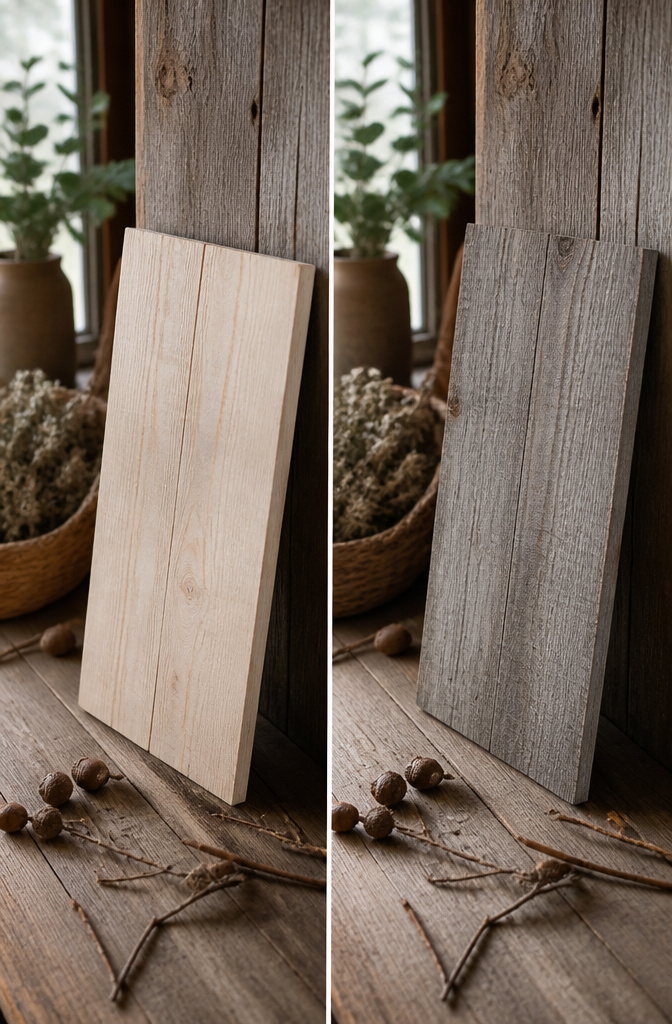
Vinegar and steel wool stain gives wood the soft gray-brown of something left on a porch railing for twenty years, and it costs about four dollars to make a pint. White oak and cedar take the color evenly; pine blotches and turns muddy unless you raise the grain with water first. The chemistry needs a full day to mature, so mix it in a glass jar and leave the lid loose enough that gas can escape.
For lettering, skip the hand-painted look unless you have a steady hand. Vinyl letters cut on a Cricut, or ordered custom from a craft store or Etsy shop, press flat and peel clean after staining. I traced the outline with a ballpoint pen to mark removal points before I committed the whole word.
The stain goes on wet and looks almost black. It lightens as it dries, so stop one shade darker than you mean to keep.
5. Autumn Acorn Banner
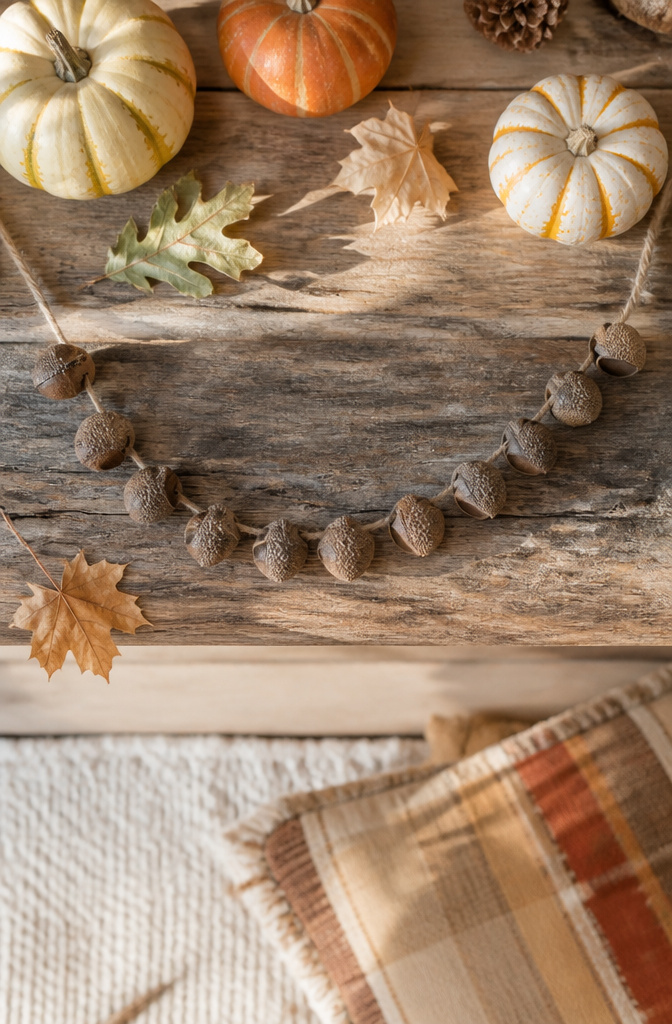
Acorn caps drill cleanest with a 1/16-inch bit and a scrap of wood underneath to catch the point. Whole acorns split less than you’d think if you go slow and let the bit do the cutting, but the caps give you more surface for the twine to grip and they keep their shape through Thanksgiving. Twine heavier than butcher’s string and lighter than sisal rope hangs straight without pulling the caps vertical, something I figured out after my first garland curled like a pig’s tail against the doorframe. Collect at least twice what looks right in the bucket. Size matching matters more than color, and the medium caps that felt abundant in October were picked over by the time I needed replacements.
6. Farmhouse Pumpkin Bucket
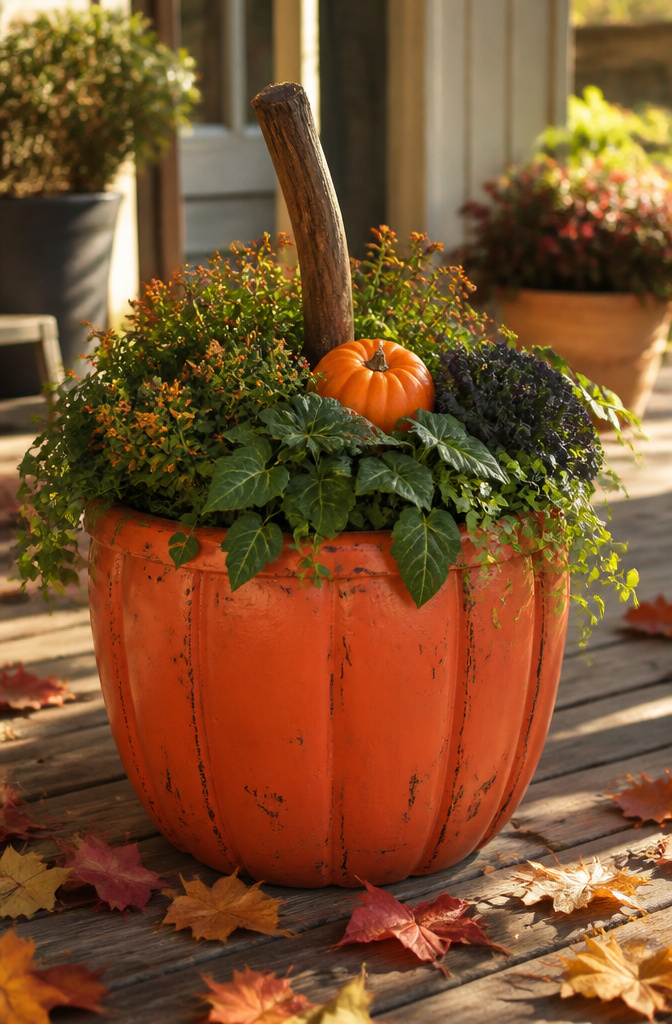
Galvanized buckets already read as farmhouse, so turning one into a pumpkin skips the step of making it rustic. The trick is paint that actually grips slick metal. Acrylic latex labeled for metal, or spray paint with a self-etching formula, will hold without the flaking you’d get from standard craft paint. I spent one autumn watching a neighbor’s porch pumpkin shed orange curls every breeze because she used the leftover wall paint from her laundry room.
Scuffing the surface matters more than primer. A medium-grit sanding sponge on the ridges and rim gives the paint something to bite into; primer on smooth galvanized metal mostly sits on top and chips clean off. The bucket I watched her redo the next year got a quick once-over with 120-grit, and that paint stayed put through two seasons outside.
For the stem, a forked stick from the yard wedged into the handle holes looks right because it is right, not painted-on. Leave the handle as-is for hanging, or remove it and coil a length of grapevine where the wire sat. The grapevine reads more finished against a dining table centerpiece; the bare handle suits a porch where wind might tip anything top-heavy.
7. Fall Wreath
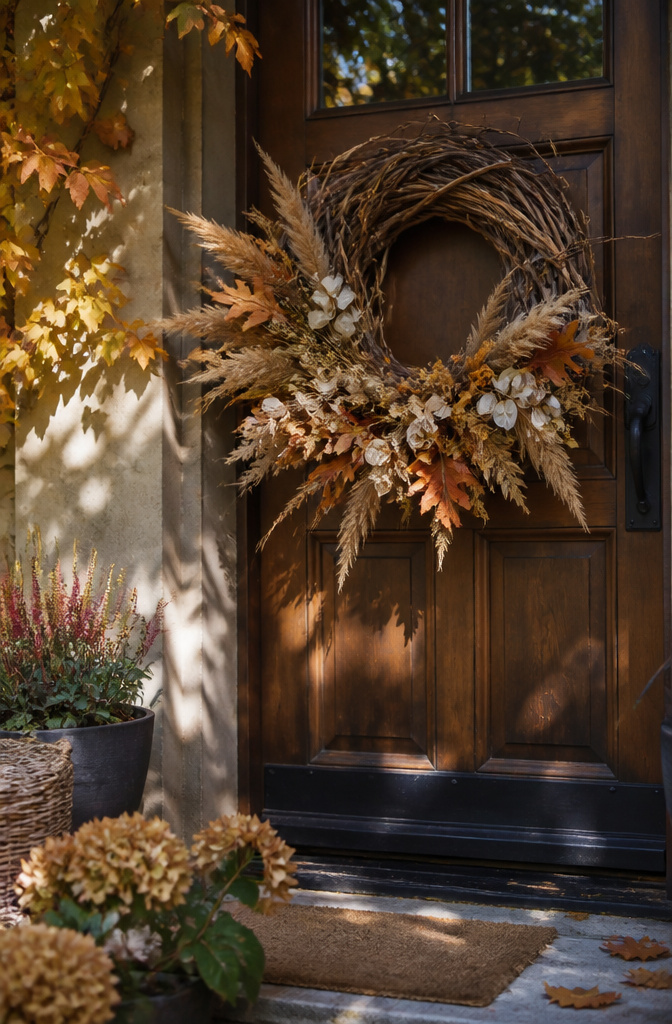
A grapevine wreath base looks like you found it in the woods, which is exactly the point. Wire frames cost less and hold their shape through humid weeks, but the gaps in grapevine do half the layering work for you. Dried material catches on those twists instead of sliding flat against a smooth circle.
The mistake that kills these is stopping at two textures. You need three: something stiff for structure, something soft to fill, and something lacy or seed-headed to catch light. For my last one, that meant dried fountain grass, a few preserved oak leaves, and some airy love-in-a-mist pods. The grass gives height at two o’clock and seven, the leaves tuck in between, and the pods soften the edges so nothing reads as glued-on.
Hanging hardware is the last decision and the one you feel every time the door slams. Ribbon looks romantic for about a week, then frays or fades. A flat sawtooth hanger on the back, painted the same color as your door, disappears entirely. Hot glue holds it through a season of temperature swings if you rough up the grapevine first.
8. Pumpkin Candle Holders
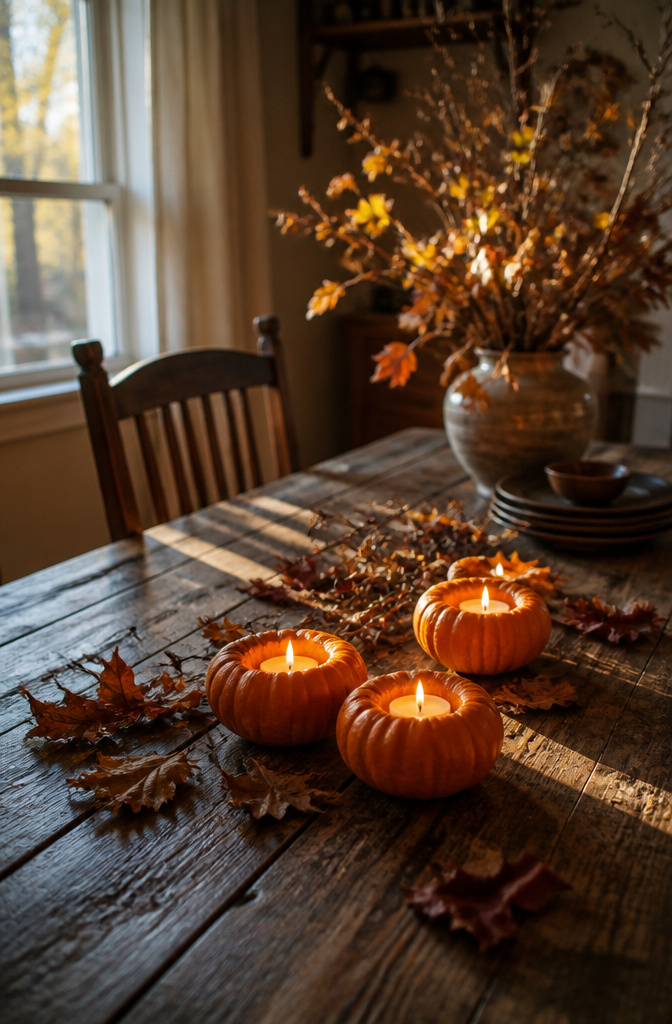
Mini pumpkins work best for this, the golf-ball-sized ones that show up in grocery bins by late September. The wall needs to stay about half an inch thick on every side; thin enough to glow, thick enough that the heat does not cook the flesh from the inside out. I learned that balance by ruining two on my first attempt, one scooped too deep and another left so heavy it never lit at all.
A melon baller does the cleanest work here. The edge is dull enough not to punch through, curved enough to lift the pulp in rounds rather than gouges. Tea lights sit flat in the hollow; taper candles need a slightly wider opening at the top, or they lean and the wax runs down the pumpkin skin instead of pooling where you can reach it.
These last three to four days on a cool windowsill before the walls soften and the scent turns from sweet to sour. That timeline shortens fast near a radiator or in a centerpiece under direct afternoon sun.
9. Fabric Pumpkins
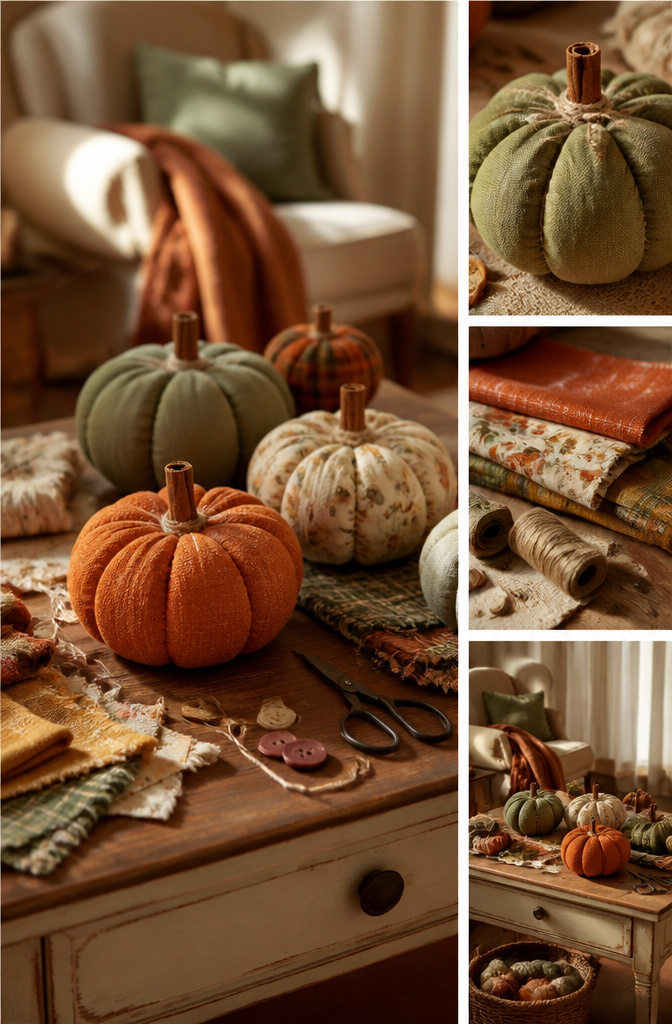
Fabric pumpkins swallow scraps that would otherwise clutter a drawer. A worn flannel shirt, a remnant of linen from last spring’s curtains, even a thick quilting cotton. The stuffing matters more than the outer cloth: polyester fiberfill goes lumpy within a season, but dried beans or rice in the base lend weight that keeps the pumpkin upright on a mantel, with fiberfill packed only in the upper walls.
The gathering stitch is where most first attempts go wrong. A running stitch spaced roughly half an inch apart, pulled tight in one motion, draws the fabric into neat pleats rather than a puckered mess. I learned to knot the thread only after the circle is fully gathered, not at each interval.
For stems, cinnamon sticks from the pantry win over anything store-bought. A dab of hot glue, a wrap of twine pressed into ridges while the glue sets, and the thing looks like it grew that way. Twine ridges need to sit in wet glue for a full minute before you trust them; the ones I rushed peeled off by Thanksgiving.
10. Gratitude Tree
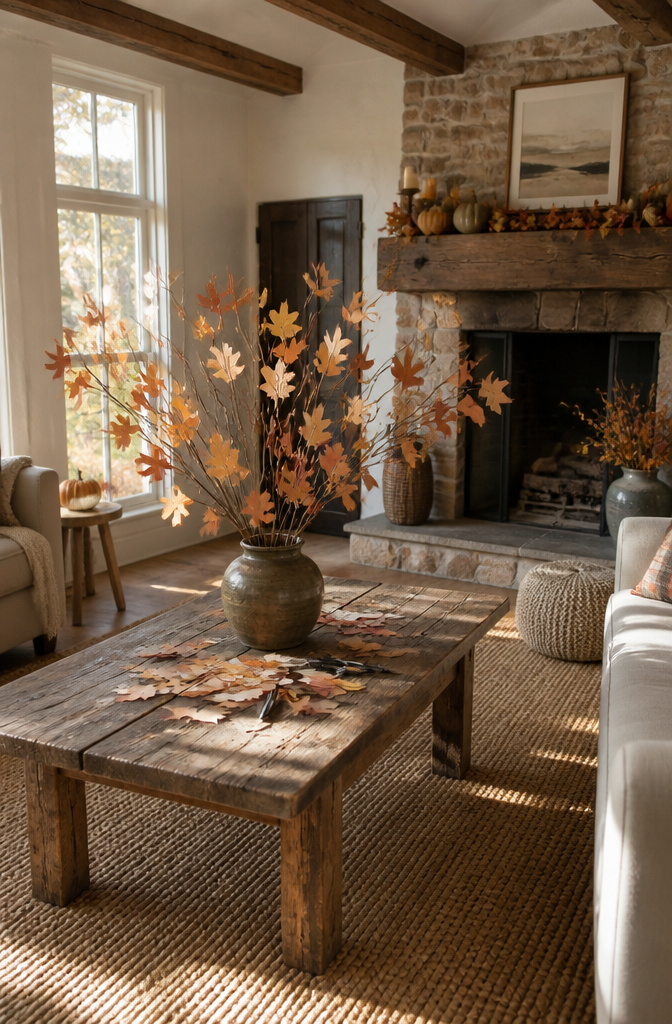
A gratitude tree needs a branch that can handle the weight of paper leaves without tipping over the first time someone walks past. Manzanita or birch branches work best here: they fork in enough directions to balance the load, and their bark grips the string or twine you tie leaves to. A single straight branch from the yard will lean, then fall, then become something you step around for three weeks.
The paper matters more than the branch. Construction paper looks right for autumn, but most pens bleed through before the ink dries. What you want is text-weight cardstock, around 80 lb, in muted golds and burnt oranges. It holds a fine-tip marker without feathering, and the leaf keeps its shape after a guest writes on it. Thicker cover stock cracks when you punch the hole for stringing.
Starting this before Thanksgiving is the whole point. The tree on the table by mid-October collects stray thoughts through the month, a sentence or two at a time, instead of becoming one more pressured activity the Wednesday before the holiday. By the time guests arrive, the branches are already heavy with everyone who stopped by in October.
What Costs What
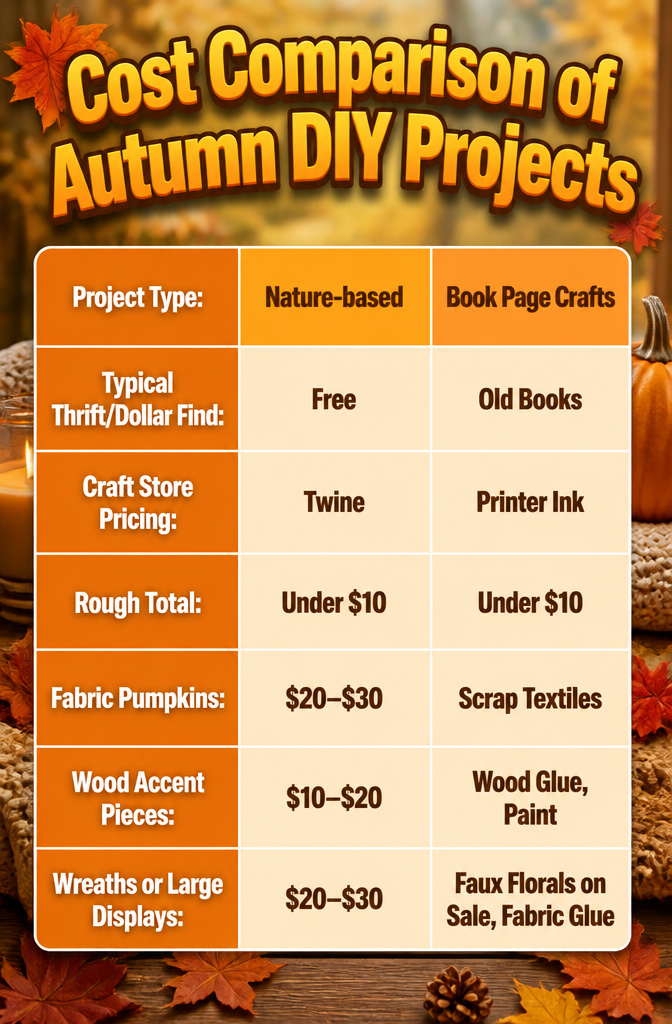
Thrift stores and dollar stores carry most of what these projects need for under $10, especially if you shop late summer when fall items sit unsorted in back bins. Wooden rosettes, scrap ribbon, and small glass jars run about $2–$3 each at secondhand shops. Paint, glue, and twine from craft store sales push a few builds closer to $20–$30, but only when wreath bases or velvet yardage get involved.
| Project type | Typical thrift/dollar find | What usually needs craft store pricing | Rough total |
|---|---|---|---|
| Nature-based (leaves, twigs, pinecones) | Free from yard or park | Twine or glue | Under $10 |
| Book page or paper crafts | Old books, stamps, Kraft paper | Printer ink if doing printables | Under $10 |
| Fabric pumpkins | Scrap textiles, ribbon | Velvet yardage, stuffing | $20–$30 |
| Wood accent pieces | Scrap wood pallets, rosettes | Wood glue, paint | $10–$20 |
| Wreaths or large displays | Wire frames, secondhand vases | Faux florals on sale, fabric glue | $20–$30 |
The real savings come from buying off-season. I watch for faux florals and pumpkin forms in January, and I grab wool and velvet remnants in spring when winter craft stock gets marked down. That timing is what keeps most of my autumn builds at the low end of the range.
Finding Free Material Outside

The best week for gathering is usually the one after the first cold snap but before the first hard frost. That window gives you color that has turned but foliage still supple enough to handle without crumbling.
Leaves need to be pressed flat in a single layer between newspaper sheets for two to three weeks before you use them in anything sealed like a frame or resin. Branches with berries or seed pods can air dry standing upright in an empty bucket, though acorns are a problem. The cap often hides a tiny wormhole, and if you miss it, the grub inside will chew its way out through whatever arrangement you built. A quick bake on a sheet pan at the lowest oven setting for an hour kills anything you cannot see.
Storage is where most collections turn to mold. Everything must finish drying completely before it goes into a container. I use paper bags, not plastic, and leave the tops folded rather than sealed so any residual moisture can escape. Last year I skipped the paper step with a batch of sweet gum pods. They looked fine for two weeks, then the bag smelled like wet hay and the whole lot went to the curb.
Projects to Make With Kids
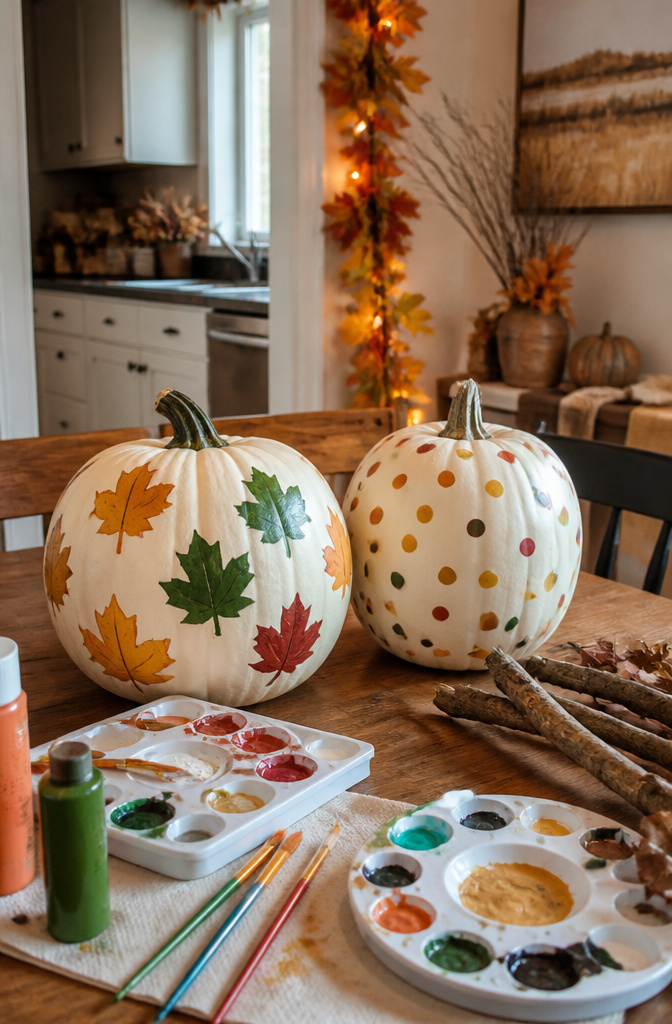
Leaf stenciled pumpkins and polka dot pumpkins both suit a wide age range, while a wood twig pumpkin rewards older kids who can handle a glue gun without a hospital visit. Adults should cut the stencil or manage the hot glue; kids handle the painting and the stick-sorting. With a six-year-old, I tried the leaf stencil and the twig build on the same Saturday. The stencil went faster than expected, but the twig pumpkin slowed us down because collecting straight sticks took forty minutes of wandering the yard, and the glue gun stage meant I did all the assembly while she watched. For the polka dot version, a child can manage the whole paint job once an adult sets out paper plates and pours the paint. Prep the materials the night before: wash the pumpkin so the stencil or paint adheres, sort twigs by length while the child is asleep, and tape the stencil in place before calling them to the table. The projects that actually finish in one session are the ones where the grown-up work happens out of sight.
Thrift Store Pieces That Read as Fall
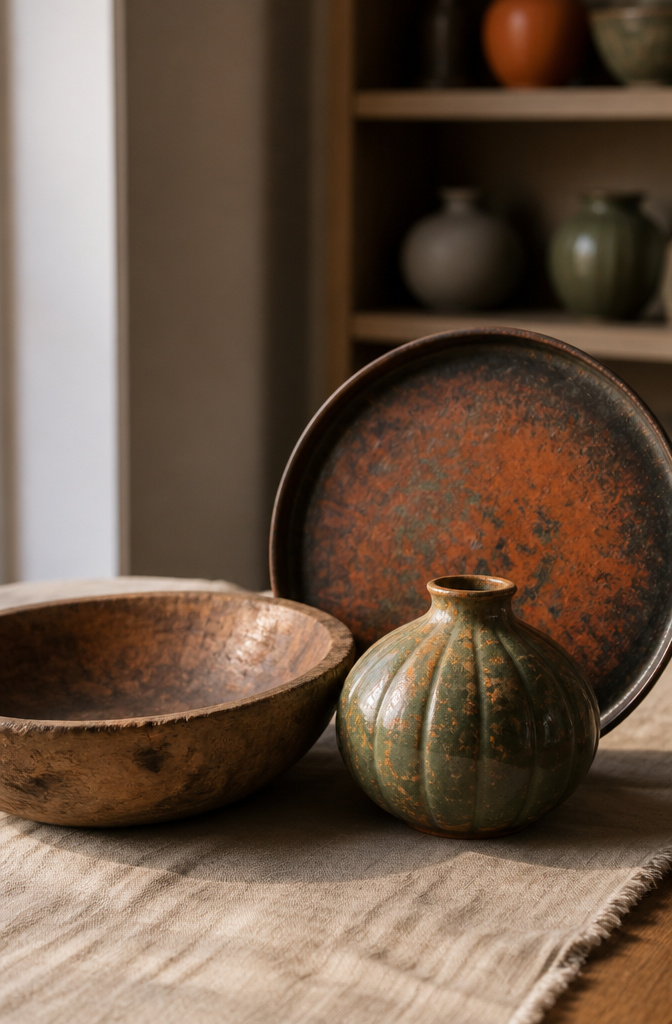
Metal, wood, and ceramic pieces from the thrift store rack read as fall with almost no effort. I look for the same shapes year-round: rounded vases that suggest gourds, low wooden bowls, and anything with a handle that could pass for a harvest jug. A single coat of paint covers anything if the surface is clean and matte, and the colors that always work are the ones already in the room, darkened by two shades. I pass on anything with a glossy factory finish, especially plastic pretending to be something else; the paint flakes off in sheets by November, and the piece looks worse than when I found it. Ceramic with a hairline crack is fine for display, but a metal tray with rust through the bottom belongs back on the shelf. The twenty-five-dollar limit I set at the door keeps me from buying "projects" that need a workshop; the best pieces need only a rinse, a dry, and a brush.
Frequently Asked Questions
How can I decorate for fall on a budget?
Thrift stores and dollar stores carry most supplies for under $10, especially if you shop late summer when fall items sit unsorted in back bins. Nature gives you free leaves, twigs, and pinecones, and scrap fabric, old books, and glass jars from home replace bought materials. The real savings come from buying off-season: grab faux florals and pumpkin forms in January, wool and velvet remnants in spring.
What are some easy DIY fall decor ideas?
The article covers ten projects: olive bucket pumpkin planters, wood bead pumpkins, leaf bowls, weathered wood signs, autumn acorn banners, farmhouse pumpkin buckets, fall wreaths, pumpkin candle holders, fabric pumpkins, and gratitude trees. Most take an afternoon or less, and several use only twine, glue, and materials from your yard or scrap bin.
How can I use natural elements in my fall decor?
Gather leaves, branches, acorns, and pinecones the week after the first cold snap but before hard frost, when color has turned but foliage stays supple. Press leaves flat in newspaper for two to three weeks before sealing them in frames or resin. Dry branches upright in open buckets, and bake acorns at the lowest oven setting for an hour to kill hidden grubs before stringing.






