

The best christmas tiered tray ideas span from a ten-dollar weekend build to heirloom ceramic village pieces, and the deciding factor is usually how much empty space you are willing to leave. Heat above 70°F will soften chocolate fillers within a day, so trays near stoves or sunny windows need hard candy or faux fruit instead. A single cedar sprig laid across a wood slice base reads as intentional restraint, not emptiness, and that restraint is what separates a styled vignette from a cluttered display.
1. Miniature Trees
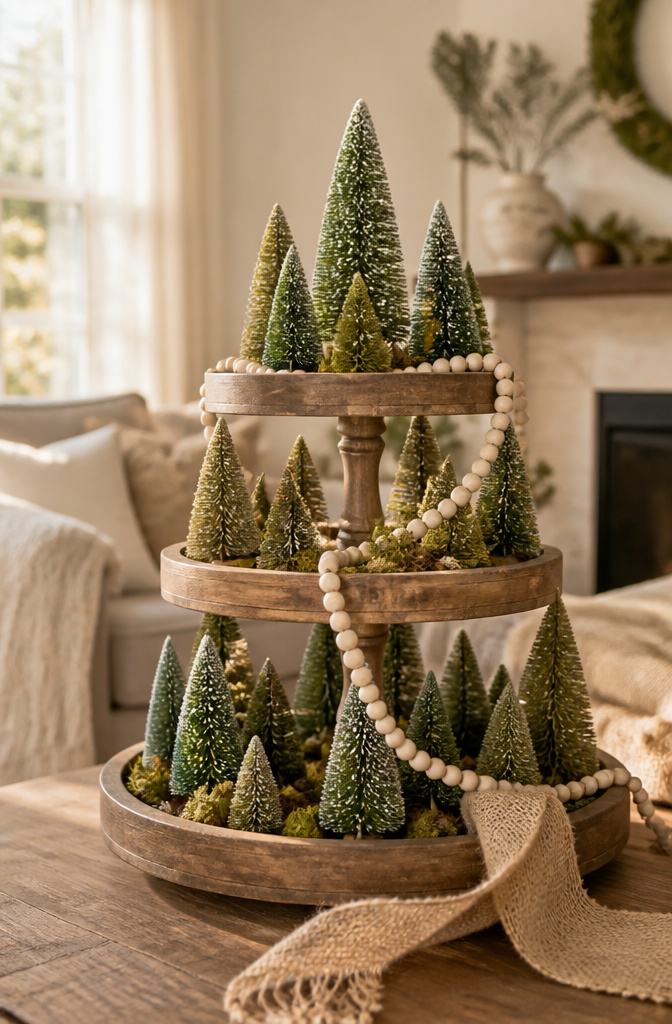
Bottle brush trees and moss-covered mini pines give a tiered tray its vertical structure, and the height variation matters more than the style you pick. A six-inch tree on the top tier reads as the tallest thing in the room, while the same tree on the bottom tier disappears behind a mug. I group mine in threes, uneven heights, and let the shortest one sit on the upper level so the tallest still owns the center. The unfinished edge of a burlap ribbon falling off the bottom tier keeps the whole arrangement from looking too arranged. Sisal textures pair naturally with wood bead garland if you want the soft green-brown palette, though a single fluffy bottle brush against metal or glass gives the eye something to stop on. Anchor pieces should be your largest objects, two to six depending on tray levels, and a mini tree counts as one only if it is not dwarfed by everything around it. Fabric snow-covered trees work the same way, though they read more winter wonderland than woodland.
2. Holiday Signs

Small signs do the heavy lifting on a tiered tray because the scale is already tight. A message that vanishes on a mantel, as one collector noted, suddenly reads clear when it sits at eye level on a middle or top tier. The best placement is slightly off-center, where the eye lands after taking in the larger shapes around it.
Phrases run toward the sentimental, the seasonal, or the plainspoken: "thankful," "gobble," a Santa reminder, a line about believing in the season’s magic. Styles follow the same split. Farmhouse leaners favor painted wood with distressed edges; cleaner setups work with simple block lettering on a small easel. Either way, the sign fills a gap without adding bulk, and swapping one out takes thirty seconds when you want a fresh look by New Year’s.
3. Ornaments

Matte white ornaments in graduating sizes cluster well on a tiered tray, especially with a single pearl spray tucked beside them for a glint of shine. The trick is keeping finishes to two at most: pair matte with shiny, or metallic with glitter, but avoid letting all four compete on one tier. A shallow wood bowl filled with mismatched glass ornaments, some matte and some shiny, gives instant color and texture in one scoop without looking scattered.
Larger pieces anchor each level first. A carved wooden bell on the bottom tier, filled in with smaller ornaments, keeps the eye moving upward rather than crowding the top. If an ornament comes with a string, snip it; the hanger loop reads as clutter at this scale. Eucalyptus or cedar picks tucked into gaps finish the arrangement without adding more shapes to manage.
4. Garland
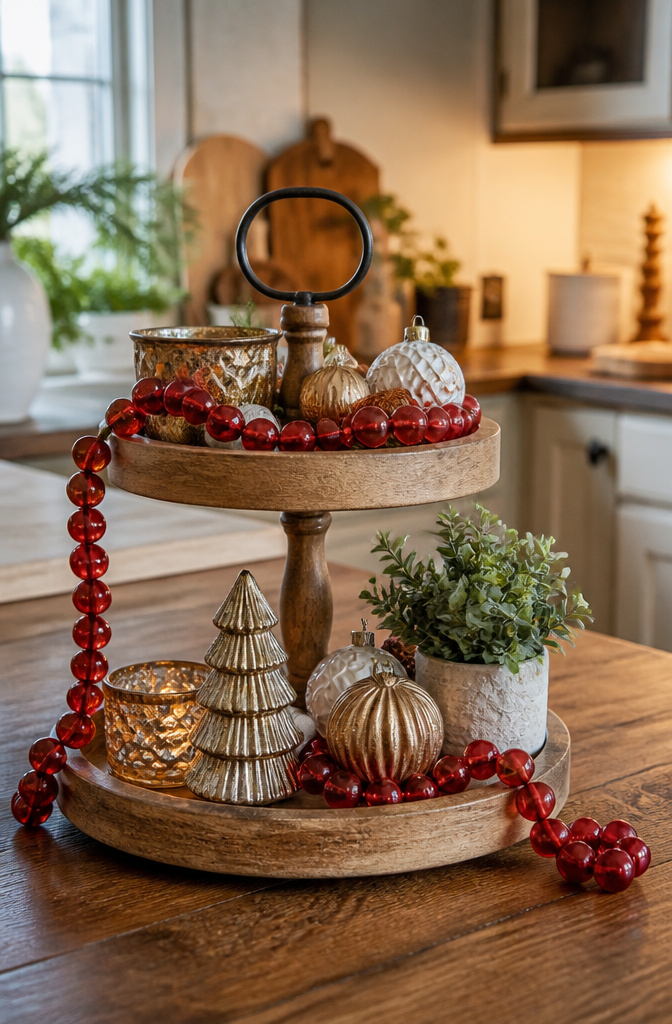
Beaded garland reads festive on a tiered tray, but the strand’s weight decides whether it drapes or slides. A heavy glass-bead loop needs a hook or a tucked corner to stay put; something lightweight, like felted balls or thin wooden beads, will hold its curve across a rim without fighting you. Fabric garland, think torn wool or pom-pom string, brings softer color and lies flatter, which matters when you’re already tight on vertical space between tiers.
Length works differently than you’d guess. A garland that is too short for the tier it sits on looks skimpy; one that pools too far onto the next level down reads messy, not abundant. I aim for about one and a half times the distance I’m covering, enough slack to tuck under a candle or weave through a tree without trailing onto the table. For wrapping a base, the same rule holds: measure the circumference, then add half again for the drape you actually want. If the garland wants to unspool, a dab of museum putty on the underside of the tray keeps it where you placed it, and lifts off clean in January.
5. Candies
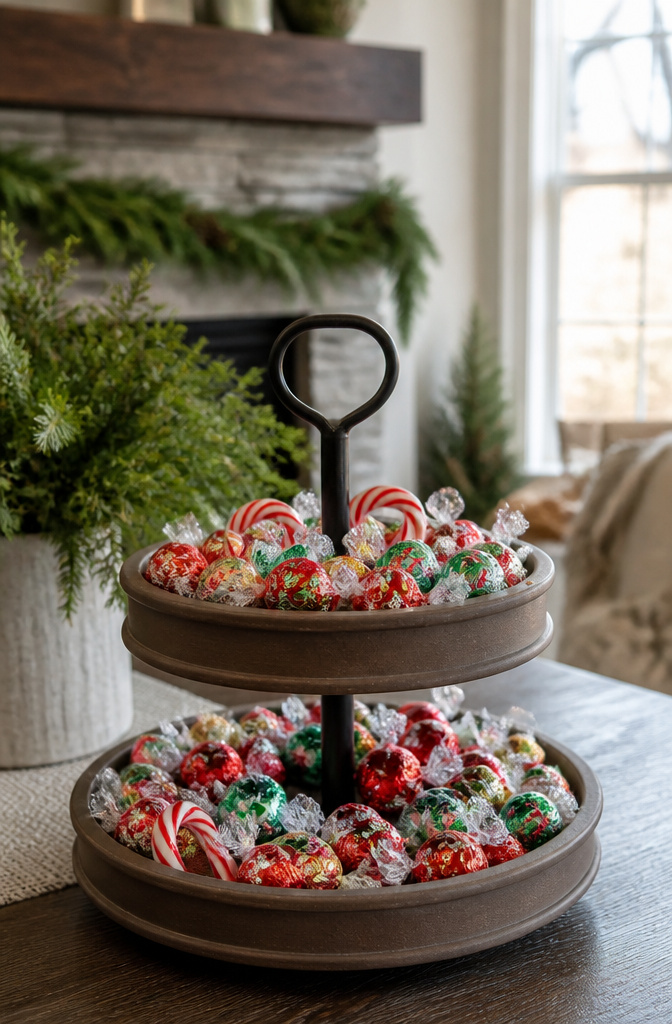
Candy canes and foil-wrapped chocolates fill the gaps between figurines faster than almost anything else, and the shimmer from gold or red foil catches light on every tier. The catch is heat above 70°F will soften most chocolate within a day, so trays near radiators, stoves, or sunny windows need a different filler. Hard candies and candy canes hold up far longer, two to three weeks easily in normal room temperature, though the canes will go sticky eventually from humidity. I swap the chocolate out after holiday gatherings and let guests take it home, which solves both the melting problem and the question of whether the display candy is still good to eat. For a tray that sits undisturbed, a mix of hard ribbon candy and a few wrapped caramels gives the color pop without the worry.
6. Pinecones
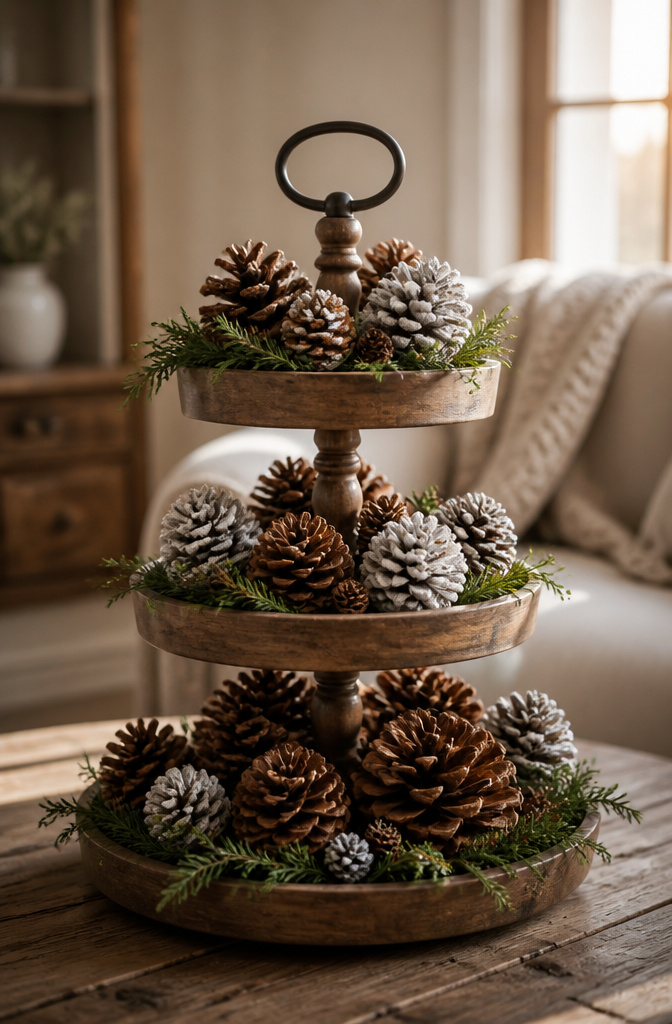
Pinecones are the kind of filler that reads as intentional rather than leftover, which matters when a tray starts looking like a junk drawer with levels. The trick is sizing them to the tier: a fist-sized cone holds its own on a bottom shelf, while thumbnail-sized ones tuck between mugs and signs on upper levels without blocking what sits behind them.
I leave some bare for the warm brown against evergreen, and dust others with faux snow or a light glitter wash for the tiers that face a window and catch afternoon light. Both treatments cost nothing if you gather from a yard or park, and they bridge the gap between the manufactured pieces and the natural elements that keep a tray from feeling too packaged.
The snow-dusted ones work best where they will not be handled; glitter sheds, and the point is the look, not the cleanup. A mix of two sizes and two finishes across three tiers is usually enough.
7. Vintage Items

Small tins and figurines from a thrift store or a relative’s attic do more work than you’d expect. One vintage piece sets a mood that five new replicas never quite match. A single tin with a worn candy-cane print, placed on the middle tier, reads as found rather than staged. I keep the rest of the tray simple: a white pitcher, a sprig of boxwood, maybe a dried rose or two. The vintage item becomes the reason the whole thing looks collected over time.
Two pieces are enough. A small moose ornament beside a metal buffalo-check mug, both new but styled to feel like they’ve been in the family, fills a gap without crowding. The trick is leaving space around them. A tray stuffed edge to edge looks like a display; breathing room makes it look like a corner of someone’s actual home. If the piece has a flaw, a dent or faded paint, let it show. That wear is what separates a tiered tray from a department-store window.
8. Natural Elements

Fresh cedar or holly sprigs do the heavy lifting on a Christmas tiered tray without demanding much space. One single cedar sprig laid across a wood slice base reads as intentional restraint, not emptiness, and the green pops harder when it is not fighting three other textures on the same tier.
Weaving ribbon in a loose crisscross and tucking holly berry sprigs into the gaps adds depth the flat ribbon alone never achieves. The berries carry the classic Christmas color story while the stems introduce something irregular against the tray’s clean lines.
Fresh greenery demands some honesty about upkeep. A cedar sprig cut from the yard lasts roughly a week indoors before browning at the tips; faux versions from the craft store solve this if your tray sits near a heat vent. Either way, vary the material against metal, wood, or ceramic nearby so the eye keeps moving. A tray of nothing but green reads as a centerpiece, not a styled vignette. The sources that stuck with me kept greenery to accents and let the other objects breathe.
9. Miniature Houses

A miniature house makes a natural anchor for any tier, though the trick is matching scale to the tray itself. A two-inch ceramic cottage disappears on a wide farmhouse stand, while a four-inch plastic piece crowds a six-inch round. Most trays need two to six anchors total across all levels, so one house per tier is usually enough.
Gingerbread styling is the budget move here. Plastic dollar-store houses take acrylic paint well; a caramel base coat with white icing details runs about the cost of a coffee and dries overnight. If the house lights up, tuck the battery pack behind it or under a loose runner; visible cords ruin the village illusion. Ceramic village pieces cost more but need no paint, and their weight keeps them steady on narrow top tiers.
For height variation, a small lantern on the upper level paired with a house below builds a skyline without clutter. A reclaimed wood crate or even a clementine box on the bottom tier lifts the back row so the house reads from the front. Battery lanterns work best here; the glow catches the windows after dark, but the cord stays hidden in the crate.
10. Seasonal Fruits

Real fruit on a Christmas tiered tray gives you color that reads as intentional, not accidental. Pomegranates and apples both hold up at room temperature for two to three weeks before they start to soften or wrinkle, which gets you through most of December without a replacement run. After that, the same grocery trip that restocks your kitchen can restock the tray.
The catch is timing. Set the fruit out too early and you are babysitting it; too late and you miss the week guests actually see it. I treat the tray like a fruit bowl that happens to be vertical: buy firm, unblemished pieces, check them when I walk past, and swap anything that dents before it attracts attention. Faux fruit exists, but the weight and slight imperfection of the real thing is what makes the arrangement look gathered rather than bought as a set.
If you already use a tiered tray in fall, the same apples bridge straight into winter. After Christmas, pomegranates slide out and citrus slides in, and the structure of the display never has to change.
Theme Selection
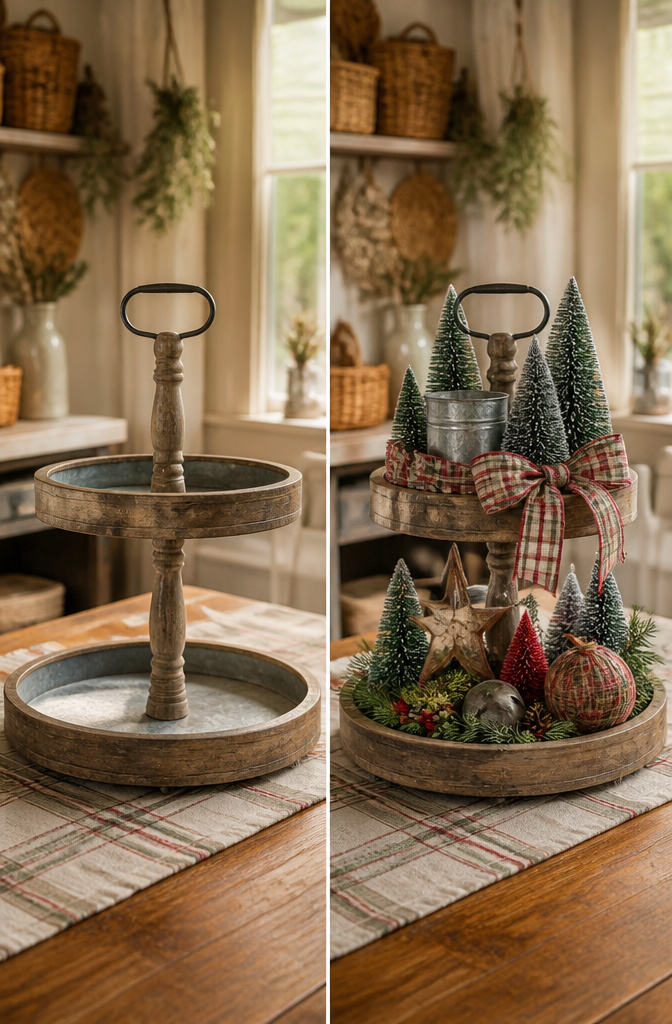
A Christmas tiered tray can go bare or cluttered fast if the items don’t share a common thread. Picking rustic, vintage, or whimsical as your anchor before you shop keeps every layer intentional rather than accidental.
Rustic pairs galvanized metal trays with bottle brush trees and soft plaid ribbon. Vintage leans on old postcards, dried roses, and wooden rounds that blend with cabin tones. Whimsical goes hot cocoa bar or gingerbread house with neon green and cherry red hits that read fun rather than formal.
The tray itself sets the tone. Galvanized metal carries a cooler, farmhouse feel. Wood warms the whole scene toward cottage or vintage. Match the base to your theme and the rest stacks easier.
Color follows the same rule. Neutral winter palettes let texture do the work. Bold schemes need restraint so the eye has somewhere to rest. Either way, deciding before the first figurine hits the tier saves the clearance-bin explosion look and the Sunday afternoon do-over.
Color Schemes That Work

Red and green still reads as Christmas because it works, but it only works if the rest of your room can handle it. My living room runs neutral year-round, so last year I tried a tray in neon green and cherry red and it looked like a yard sale on my TV stand. The tray itself is small, maybe twelve inches tall, which means it either punctuates your existing palette or fights it.
A neutral tray with white, natural wood, and a little gold or silver blends into farmhouse or modern spaces without asking you to repaint a wall. Metallics do the heavy lifting here: a buffalo-check metal mug, a twine ornament, metallic balls tucked between larger pieces. The sources I found kept coming back to this combination for renters who cannot change their surroundings.
If your sofa and shelves already lean warm, brass and copper tones in the tray echo instead of clash. Cooler rooms, gray or blue-based, want silver. The intentional move is choosing whether the tray matches your metals or introduces one accent metal as a single pop. Either way, the tray sits under your stockings or beside the coffee maker, so the sight line matters more than the tray itself.
Layering by Height and Size

- Set the biggest piece on the lowest tier first. A clementine box filled with pinecones works, or a stack of three worn hardcovers with cracked spines. That base determines everything above it.
- Let the next layer up step down in scale, not just height. A small battery lantern on top earns its place by drawing the eye upward; miniature ornaments tucked inside a mug fill narrow gaps without competing.
- Fill with your smallest items last. Paper straws in a jar, beaded garland draped loose, a chippy painted star leaning rather than standing upright. That slight lean is what sells the lived-in look.
- Step back and check from where people will actually stand. Tiered trays read from above and below, not straight on. All your greens on one side or all your whites on the top tier throw the balance off from the sofa or the kitchen island. Spread scale and variety across levels and left to right.
- Stop before it feels finished. Empty space keeps the arrangement from reading cluttered, and the tray is easier to edit after a day of passing it than it looks in the moment.
DIY Additions on a Weekend

Two weekend builds can fill a tiered tray without touching a single store-bought figurine. Fringe ribbon trees start with a large circle traced onto lightweight cardstock, a slit cut to the center, and the whole thing rolled into a cone. Wrap 1-inch fringe ribbon from the base up, hot-gluing as you go, and you have trees in varied sizes that read as a set without matching exactly. The materials run under ten dollars if you already own a glue gun, and one evening gets you three or four.
Wine corks pile up fast if you cook with any regularity, or a friend who does will hand you a bagful. Glue them into a rough triangle, then wind copper wire through the stack and hang a few small bells at the tips. The wire does two jobs: it holds the shape and gives the whole thing a glint that reads festive from across the room. Corks are uneven by nature, so the silhouette stays charmingly imperfect rather than sloppy. Between the two projects, a Saturday morning and maybe thirty dollars covers the tray’s middle and top tiers with pieces that look collected over years rather than made in an afternoon.
Frequently Asked Questions
What can I put on a Christmas tiered tray?
Miniature trees, holiday signs, ornaments, garland, candies, pinecones, vintage items, natural elements, miniature houses, and seasonal fruits all work well. Each item serves a different purpose: trees and houses give height, signs and ornaments fill mid-size gaps, and pinecones or candies tuck into smaller spaces. The key is mixing two to six anchor pieces per tier with softer fillers so nothing looks crowded.
How do I style a tiered tray for Christmas?
Start with the largest piece on the lowest tier, then step down in scale as you move up. A battery lantern or small house on top draws the eye upward, while paper straws, beaded garland, or leaning stars fill narrow gaps last. Check the finished tray from where people actually stand, not straight on, and stop before it feels completely full. Empty space keeps the arrangement from looking cluttered.
What themes work best for Christmas tiered trays?
Rustic, vintage, and whimsical are the most reliable starting points. Rustic pairs galvanized metal with bottle brush trees and plaid ribbon. Vintage leans on old finds, dried roses, and wooden rounds. Whimsical goes brighter with gingerbread styling or hot cocoa bar setups in neon green and cherry red. Pick one anchor before you shop so every layer stays intentional.






