
No-carve pumpkin decor ideas run from a two-minute stretch of fishnet hose to full storybook builds with cardboard armatures and X-ACTOed slits, and the one that fits you depends almost entirely on whether you need it to last past Thanksgiving or just through the weekend. The handprint method, for instance, washes off a toddler with soap and warm water but the pumpkin itself stays intact for composting; the puffy paint studded version needs a full cure before topcoating or the texture flattens entirely. Real pumpkins rot underneath tissue paper and floral arrangements, which is why the article keeps pointing you toward faux ones whenever you want the piece back next fall.
1. Handprint Pumpkin
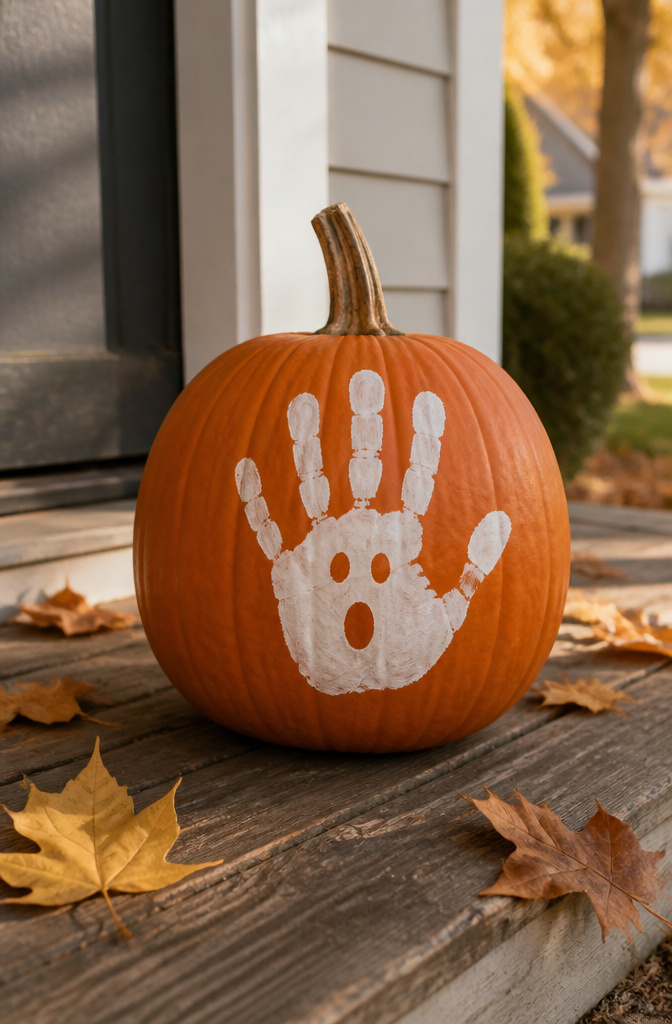
Acrylic craft paint turns a pumpkin into a keepsake without a knife in sight. I watched this method save a Halloween afternoon when a three-year-old wanted in on the decorating but every carving tool in the house was an automatic no. A handprint in orange or white paint, pressed onto a dark pumpkin, reads as a ghost or a leaf depending on which way you turn it. The child spreads their fingers, you brush the palm, and the print goes down in one firm press. Second coats muddy the detail, so the first try is usually the keeper. A small pumpkin fits a toddler hand; a medium one works up to about early elementary. The paint dries in twenty minutes and holds up outdoors if you skip the dew-heavy grass and set it on a step. Mod Podge or a clear sealer over the top helps if you want it to last past November, though for a single season the acrylic alone does fine. What sold me on keeping this in rotation is that the mess washes off the kid with soap and warm water, and the pumpkin stays intact for composting after Thanksgiving.
2. Finger Painted Stencil Pumpkins
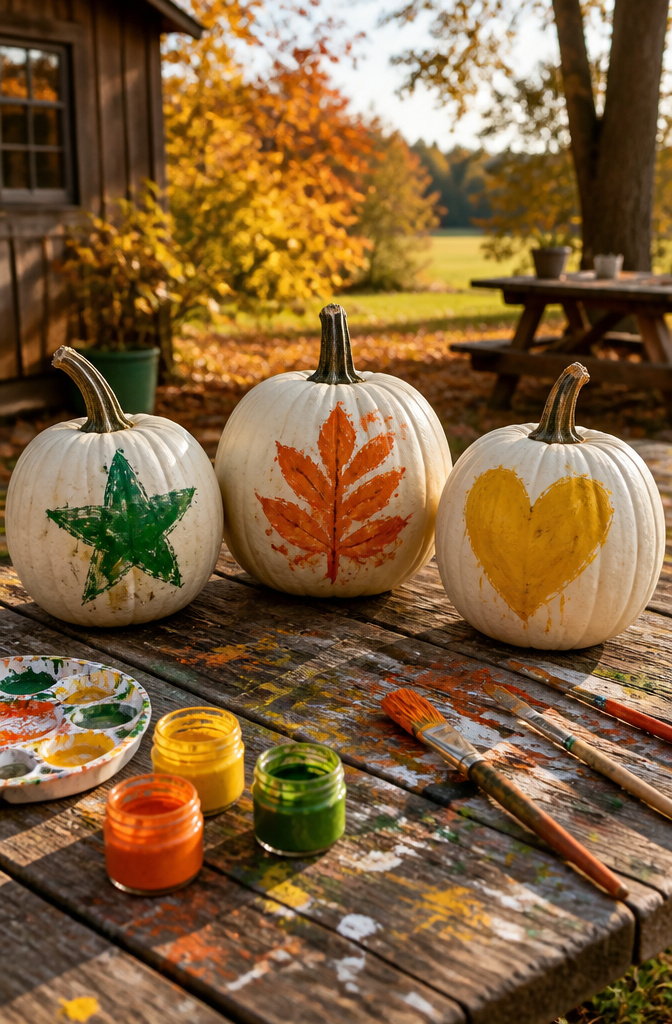
Painter’s tape and a craft knife turn finger painting into something that feels finished instead of frantic. I lay a simple stencil, something like a leaf or a star, directly onto the pumpkin, then let the kids blob the paint over the edges with their fingers. Once the paint dries, the tape peels away and the shape underneath stays clean. Finger paints work best at about the thickness of a nickel; too thin and it bleeds under the tape, too thick and it never sets.
For older kids who want sharper edges, paint pens or a Sharpie do the same job without the mess. The marker gives them control the stencils alone cannot, and the result reads as folk art rather than preschool craft. Faux pumpkins would have saved the ones we made; by November they were soft spots and regret. Something to think about if you want the design back next fall.
3. Puffy Painted Studded Pumpkins
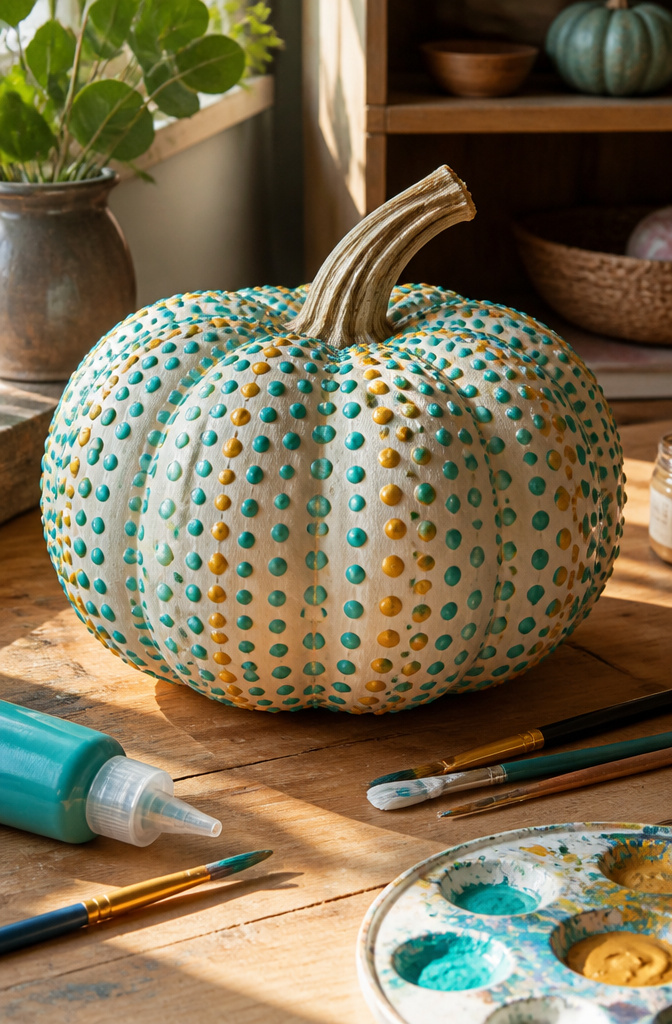
Puffy paint gives pumpkins a raised, studded texture that catches light and casts tiny shadows across the surface, something flat craft paint never manages. The technique is simple: draw your pattern directly onto the pumpkin with puffy paint, let it dry completely, then roll a solid coat of craft or latex paint over the whole thing. The dots or lines stay dimensional underneath. Rows of dots work especially well for stripes, chevrons, or even a monogram if you want something personal at the entry. The puffy paint holds up longer than you’d expect on a pumpkin shell, and the layered finish looks far more expensive than the dollar or two the materials cost. Latex paint works here, and leftover house paint is fair game, so this is a good project for burning through the half-empty cans in the garage. The one catch is patience: the puffy paint needs to be fully cured before you topcoat it, or the texture flattens out and you lose the effect entirely.
4. Tissue Paper Mod Podge Pumpkins
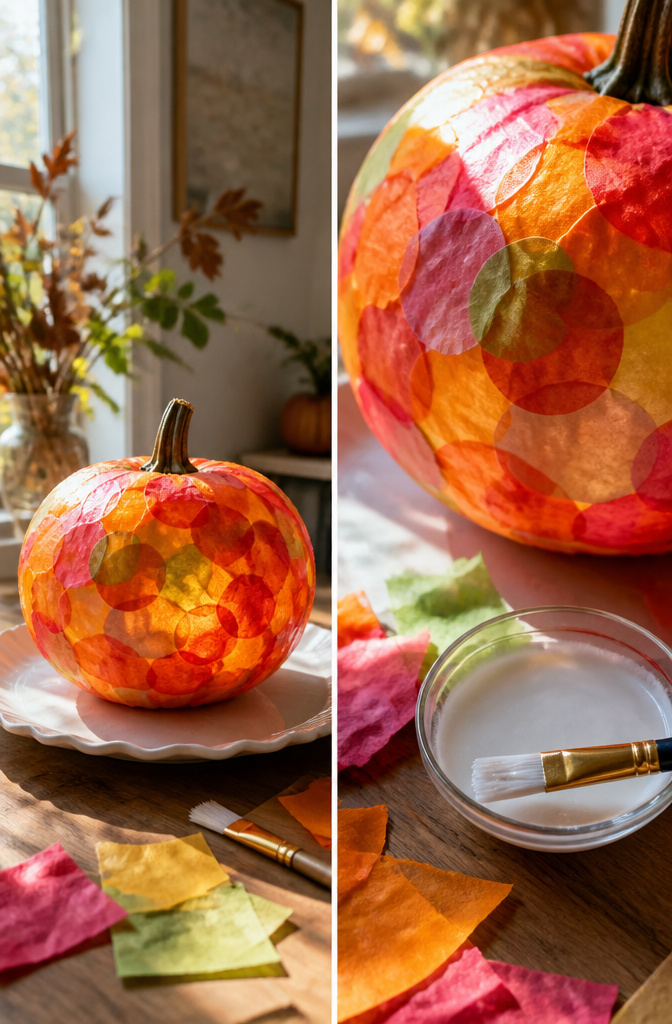
Tissue paper and Mod Podge build up a translucent, stained-glass layer that reads as color rather than surface paint. The trick is the overlap: cut circles in varied sizes, brush a thin coat of Mod Podge onto the pumpkin to make it tacky, then press the tissue down so the edges feather into each other. The paper tears if you overwork it, so lay each piece once and leave it.
One coat of adhesive underneath and a second on top seals the paper while it adheres, which is why Mod Podge shows up across so many no-carve methods. It finishes and binds in the same step. A two-year-old can place the dots once the surface is sticky enough, and the cleanup is water while it is still wet. The color range is open: orange and black if you want Halloween, or any palette that already lives in your room. I have seen these done with three tones of the same color family so the light coming through them shifts across the day.
Faux pumpkins work better than real ones for this. The tissue paper lasts, the pumpkin does not rot underneath, and you can store the finished piece for next year.
5. Gothic Panty Hose Pumpkins
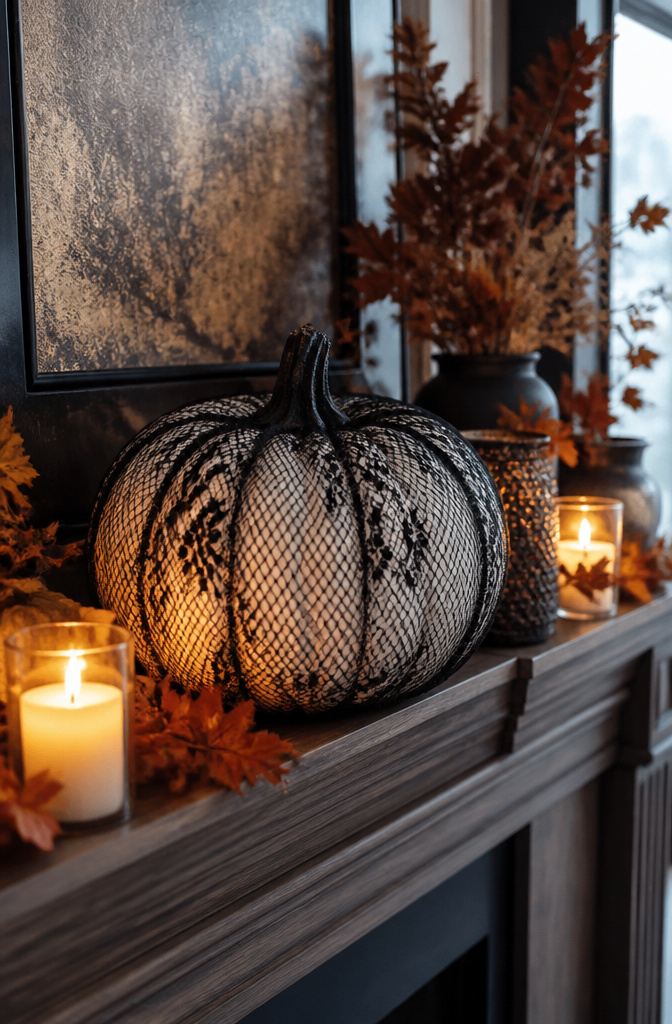
Black fishnet pantyhose stretched over a pumpkin gives an instant spiderweb texture that reads more gothic than crafty. I tried this after spotting clearance hose at a drugstore, and the whole thing took under two minutes per pumpkin. The trick is pulling the fabric taut enough that the pattern opens up, then working the excess underneath so the pumpkin sits flat. No adhesive needed if the stretch is tight; the elastic holds itself in place on round shapes.
White pumpkins show the pattern best, since the black net pops against pale skin instead of disappearing into orange. These are strictly indoor decor, though. Outdoor humidity relaxes the nylon, and one raindrop turns the texture into a sagging stocking. For a display that lasts through October, keep them on a mantel or table where the light catches the mesh and throws lace shadows on the wall behind.
6. Painted Cat Pumpkin
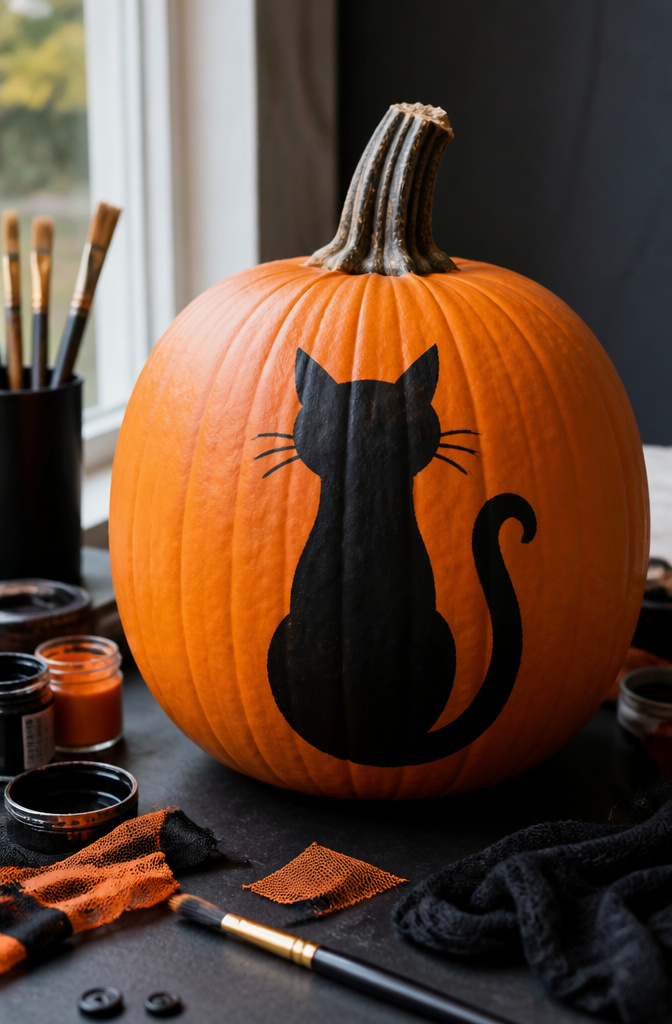
A black cat silhouette painted on an orange or white pumpkin reads instantly from the curb and needs nothing fancier than black acrylic craft paint. The shape is forgiving: two pointed ears, a rounded head, and a tail curling up one side. A flat or satin finish hides brush marks better than gloss, which catches porch light and breaks the silhouette at a distance.
White pumpkins give the highest contrast, but an orange pumpkin with a black cat still registers because the shape is so familiar. Paint the whole design first, let it dry, then thicken the outline where the ears meet the head or the tail loops back. Those junctions blur if the paint is too thin.
Stencils help if freehanding makes you nervous, though a slightly lopsided ear usually looks more alive than machine-perfect symmetry. The paint layer needs maybe two coats for coverage over the pumpkin’s waxy skin. A small bottle of craft paint runs under two dollars and covers several pumpkins with cat to spare.
7. Mummy Wrapped Pumpkin
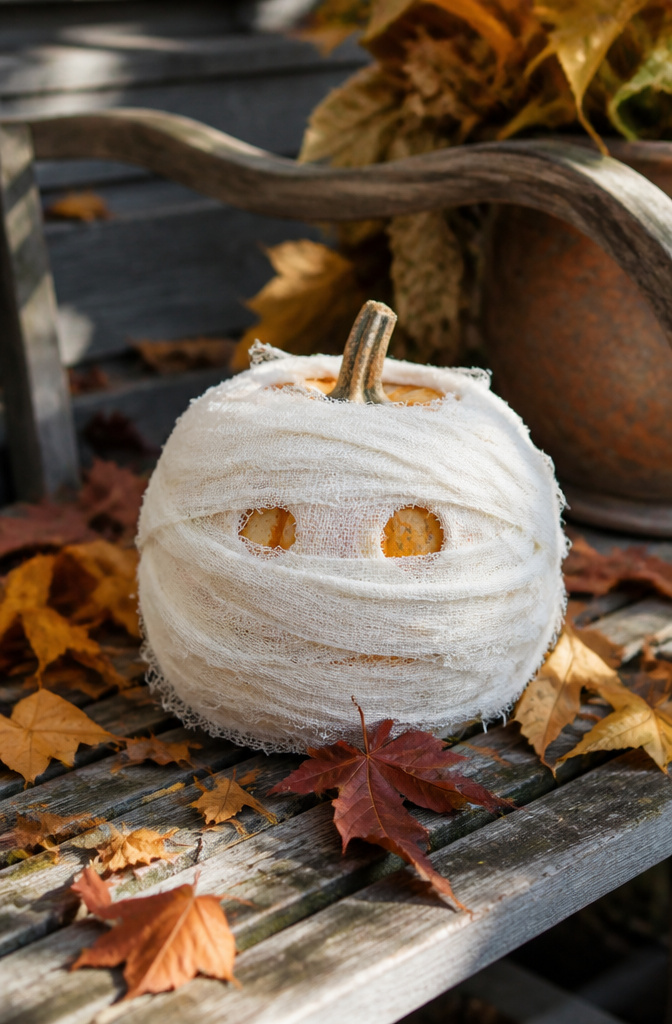
The mummy wrapped pumpkin is one of the few no-carve projects where kids genuinely do most of the work. A small pumpkin, a roll of white gauze or torn muslin strips, and a glue stick are enough to get started. They wrap the fabric around the pumpkin in overlapping layers, leaving gaps for the eyes, then glue the ends down. Two googly eyes pressed into the gaps finish the look in about twenty minutes.
The gauze frays at the edges over time, which actually helps; the pumpkin looks more weathered and less like a craft-store prop. A glue stick holds better than liquid school glue because it dries fast enough that impatient small hands are not smearing wet adhesive across the living room table. I have seen this done with cheesecloth too, but the weave is so loose that it slides and bunches unless you double-layer it, which defeats the point of a quick project.
This works on any pumpkin size, though the small pie pumpkins are easier for kids to hold steady. The wrapping covers dents and soft spots, so you can buy the discounted pumpkins from the grocery bin without anyone noticing.
8. Sticker Face Pumpkin
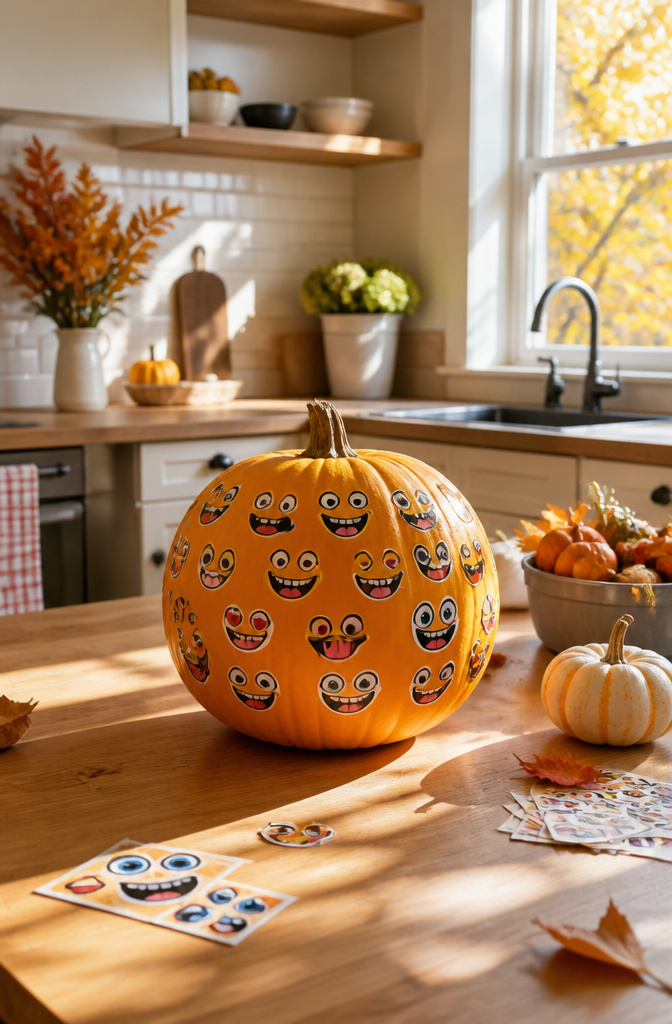
Adhesive sticker faces are the most reusable and least messy no-carve option, which makes them the one I point people toward first when toddlers are involved or when a pumpkin needs to last two to three weeks indoors. A sheet of stick-on eyes and mouths runs a few dollars, and the whole job takes under five minutes with no newspaper spread across the kitchen table. The pumpkin stays intact, so it does not start to rot the way a carved one does, and the stickers peel off clean if you want to swap expressions mid-month. I have seen the same set of googly eyes migrate from a squat pie pumpkin to a taller jack-be-little and back again over the course of a season. The real advantage is longevity: because the skin is never broken, the pumpkin keeps its firmness for the full stretch of fall decorating without the mold that carving invites. For extra variation, mix sticker sizes and pair them with a quick drawn-on expression, though the stickers alone do plenty of the work.
9. Floral Design Pumpkin
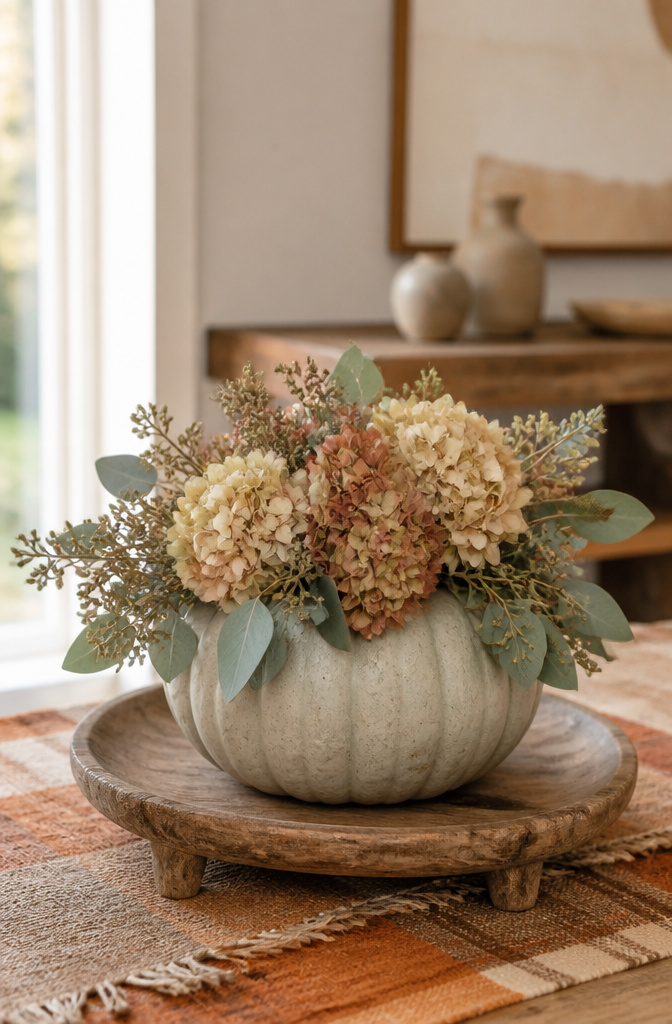
White or pale pumpkins carry flowers better than orange ones because the color doesn’t fight the bloom. I learned this after trying dried hydrangeas against a classic jack-o-lantern orange and watching the petals turn muddy. The neutral pumpkin acts like a linen tablecloth, letting the flowers read as the decoration rather than competition.
For the flowers themselves, dried hydrangeas hold up through October into November without the dusting faux stems eventually need. Eucalyptus works too, though it sheds. Magnolia leaves last longest but read more winter than fall to my eye, so I use them sparingly unless I’m bridging straight to Thanksgiving.
The attachment is simple and reversible, which matters if you’re renting or just indecisive. Hot glue on the stem base, press the bunch where the natural stem meets the pumpkin, and let it set before you move it. A pumpkin this dressed needs a low bowl or tray underneath, not a bare table; the flowers throw the visual weight upward and the whole thing looks unmoored without that anchor. I tried one directly on a mantel last year and kept nudging it back to center all evening.
This setup shifts cleanly from Halloween to Thanksgiving by pulling any spooky accents and letting the flowers carry the season alone. The same pumpkin with the same hydrangeas, just recontextualized. That longevity matters when you’re working a weekend timeline and want the effort to count for more than one dinner.
10. Ombre Pumpkin
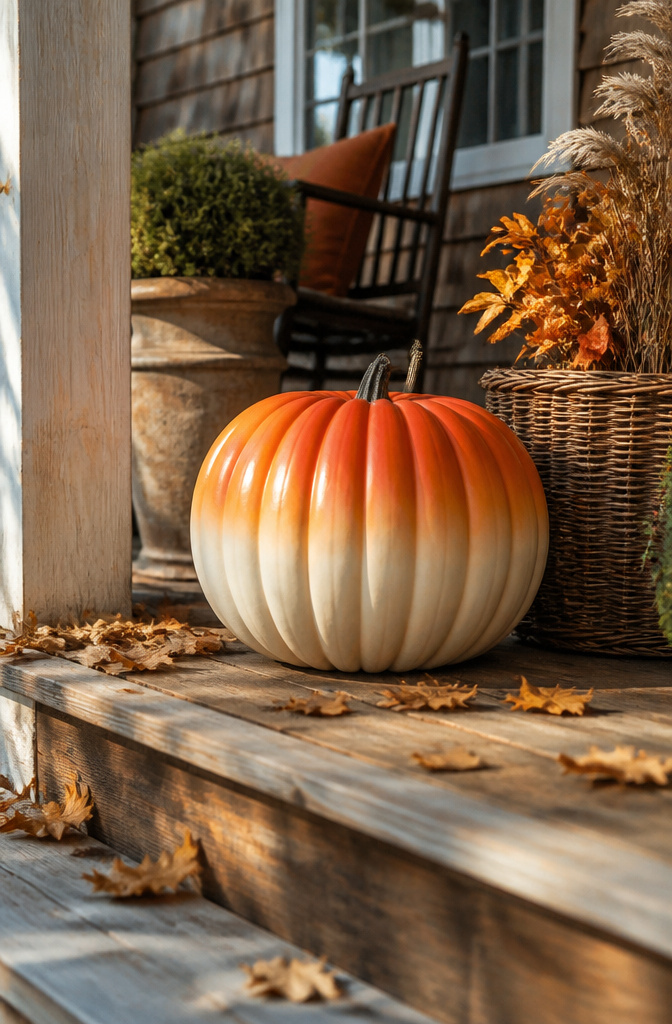
The ribs on a real pumpkin do half the blending work for you, which is why the ombre effect looks like a paint skill you spent years learning when really the ridges hide every transition. Pick two acrylics, maybe a burnt orange and a pale cream, or add a mid-tone if you want more steps. Paint the darkest shade across the top third of each rib, the lightest across the bottom third, and the middle tone where they meet, or just blend the two directly if you are keeping it simple.
The paint stays wet long enough to work it with a dry brush before it sets, maybe five minutes on a cool afternoon, less if the sun is hitting the porch. Vertical strokes follow the rib lines and keep the gradient looking intentional; horizontal strokes fight the shape and read as messy. A flat or filbert brush, about half an inch wide, covers the curved surface without leaving too many ridges of its own.
Two coats hide the pumpkin’s waxy skin. The first coat looks streaky and the second one locks in the depth. I have seen people seal it with a spray varnish, but acrylic on a gourd that sits out six weeks does not need it; by the time the paint would wear, the pumpkin is heading for compost anyway.
11. Glitter Pumpkin
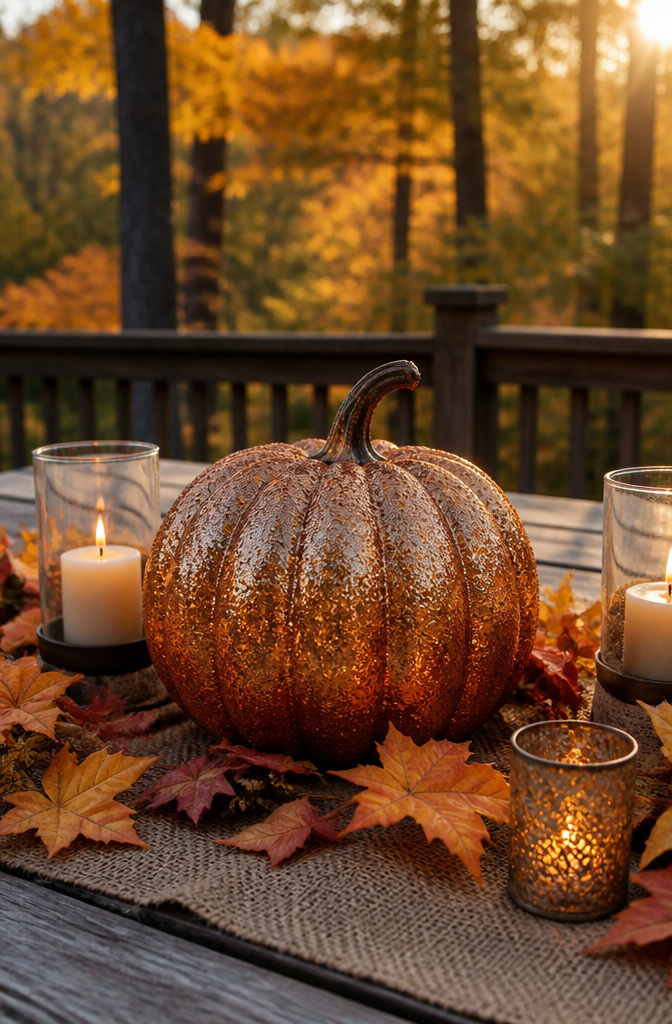
Fine glitter catches porch light in a way paint never manages, turning a pumpkin into something that flickers when you walk past. The method is simple enough: brush on adhesive, work over a tray, and tap the glitter through a sieve so it lands even. I learned the tray part the hard way after finding sparkles in my floorboards for three months.
This finish belongs outside or on a covered porch. Indoors, loose glitter sheds every time someone brushes past, and vacuuming only drives it deeper into carpet pile. Wind and rain will eventually dull the surface, but a covered spot keeps the effect intact through October. For display in a living room or entryway, sealed glitter paint is the less theatrical but far more practical choice.
12. No-Carve Unicorn Pumpkin
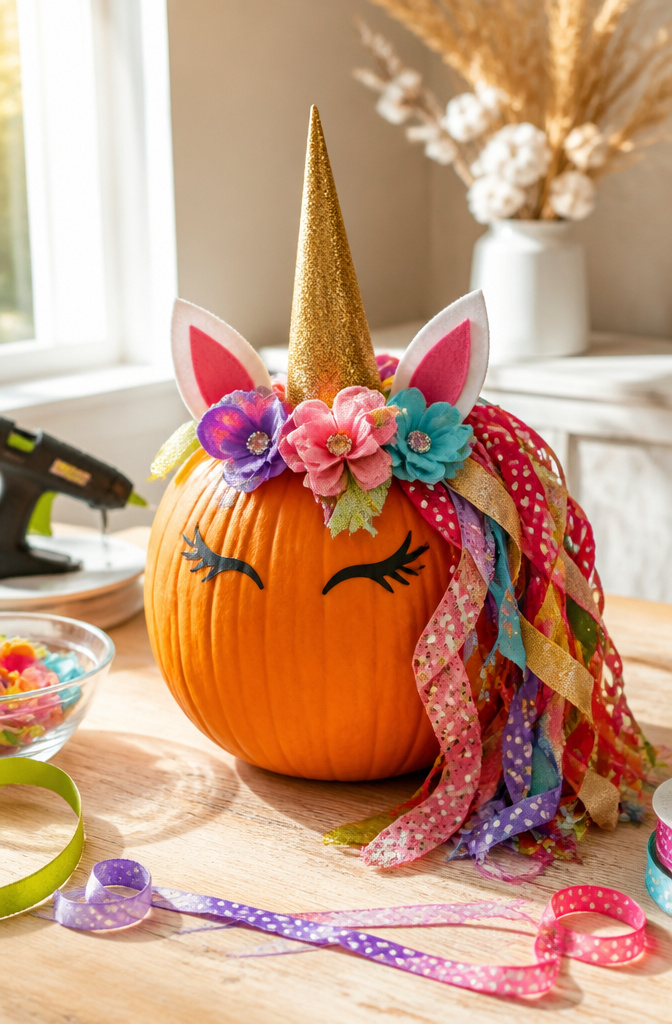
A unicorn pumpkin looks complicated until you break it into two parts: the horn and the mane. Craft foam shapes the horn, rolled into a tight cone and sealed with hot glue. I like a 6-inch height for a medium pie pumpkin; anything taller droops after a day in warm weather. Ribbon forms the mane. Cut strips in two lengths, shorter for the forelock above the horn, longer for the sweep down the neck. Hot glue the ribbon ends inside the cone before you attach the horn; trying to tuck them under afterward leaves glue strings everywhere.
The ears are simple triangles of the same foam, pinched at the base while the glue cools so they stand upright. No paint or drawing needed, which is the relief here. The materials do the work. Satin ribbon catches light like a real mane; grosgrain holds its curl better if you want a cartoon look. Either way, the whole build runs under ten dollars and an hour, and the pumpkin stays intact for roasting after Halloween.
13. Succulent Planter Pumpkin
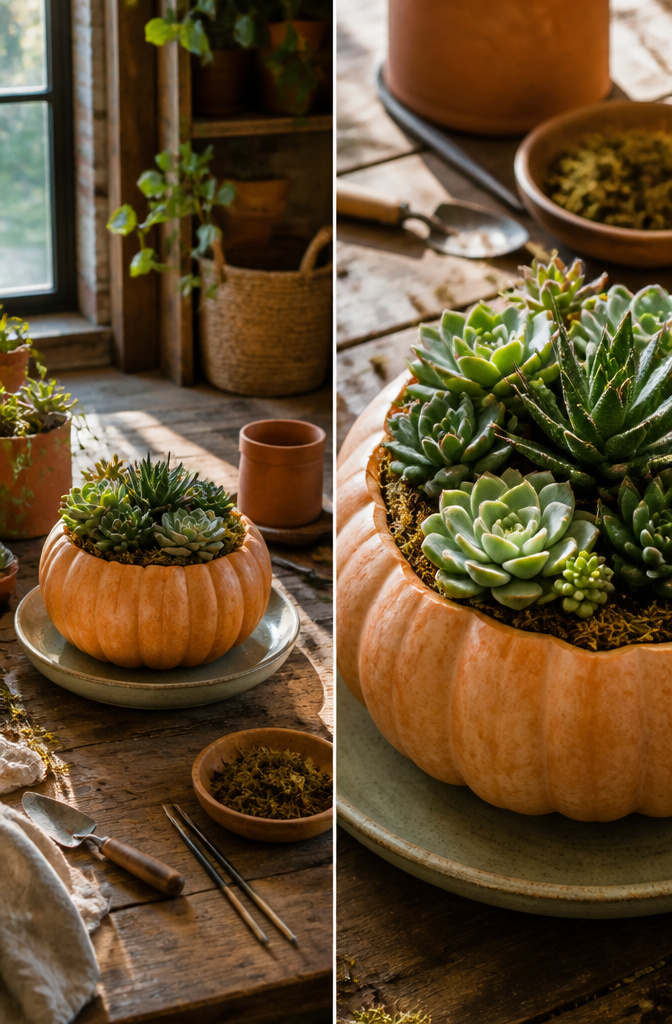
A real pumpkin turned living centerpiece asks for the top third cut clean and the seeds scraped out, same as you’d prep for carving, but the work stops there. Fill the hollow with potting soil, tuck in a few small succulents or a starter mum, and set the whole thing on a plate to catch moisture. The pumpkin itself will soften faster without its lid and with damp soil inside, so this is a two-to-three-week display, not a month-long one. When the walls start to give, the plants lift out intact and move straight into pots or the garden. The pumpkin goes to compost, which is more return than a jack-o’-lantern gets you. Faux pumpkins work too if you want the look without the rot, though you’ll need to drill drainage holes and the replanting step disappears.
14. Gold Leaf Pumpkin
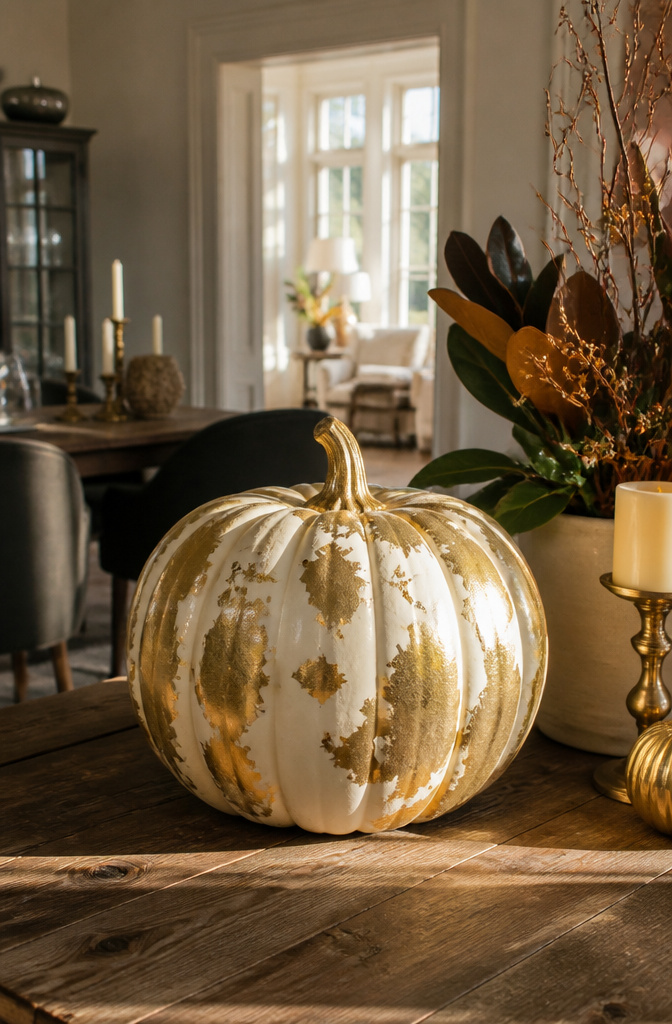
Metallic gold leaf on a pumpkin reads expensive from across the room, but the materials cost less than a takeout dinner. The trick is starting with the right base. White pumpkins or the pale gray-green ones keep the look autumnal without sliding into Halloween territory; orange fights the gold and usually loses.
The process is messier than spray paint but worth the trouble. You brush on water-based adhesive called size, wait until it turns tacky, about twenty minutes, then lay on sheets of transfer gold leaf. The leaf tears if you breathe wrong. What convinced me, watching half a dozen tutorials, was the advice to work in small patches and overlap generously. The seams disappear once you burnish them with a soft cloth.
A partial application looks better than full coverage. Covering the top third or running vertical stripes leaves some of the natural pumpkin showing, which keeps it from reading as a Christmas ornament that wandered into the wrong season. Leave the stem bare; the contrast between rough wood and bright metal is what makes the whole thing feel intentional rather than crafty.
The finished surface is surprisingly fragile. A bumped corner will flake. This is a centerpiece for the mantel, not the porch where the mail carrier brushes past it.
15. DIY Beverage Holder Pumpkin
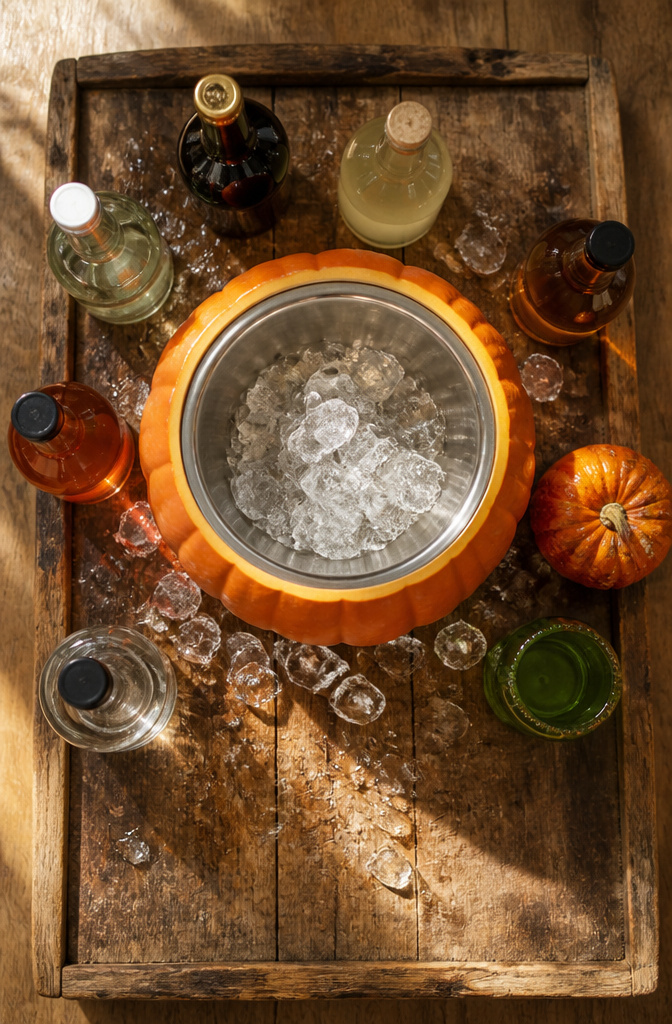
A wide-mouthed pumpkin makes the best cooler nobody expects. Cut the top opening larger than you would for a candle, wide enough that a mixing bowl or foam koozie sleeve drops in without catching on the walls. The flesh underneath the cut seals up fast, so scoop it clean the same day you plan to use it.
The bowl does the real work. A stainless mixing bowl sits heavy and steady; a soft insulated sleeve weighs less but needs wedging with a kitchen towel so it doesn’t tilt when someone grabs a can. Either way, the pumpkin is just the shell, and that is the point. It stays cold longer than you’d think, maybe two hours on a patio table, because the thick walls insulate better than a plastic tub.
This only works with pumpkins that have real size. A ten-pounder looks generous on a porch but holds maybe four bottles once the walls close in. For a gathering where people actually gather, start at twenty pounds or look for the flat-bottomed "Cinderella" types that sit level and give you more hollow for the diameter.
The cut lid does not go back on clean once you notch it for a bowl rim. Plan on the pumpkin being open all evening, and set it on a tray so the condensation puddles somewhere you can wipe.
16. 3D Animal Pumpkins
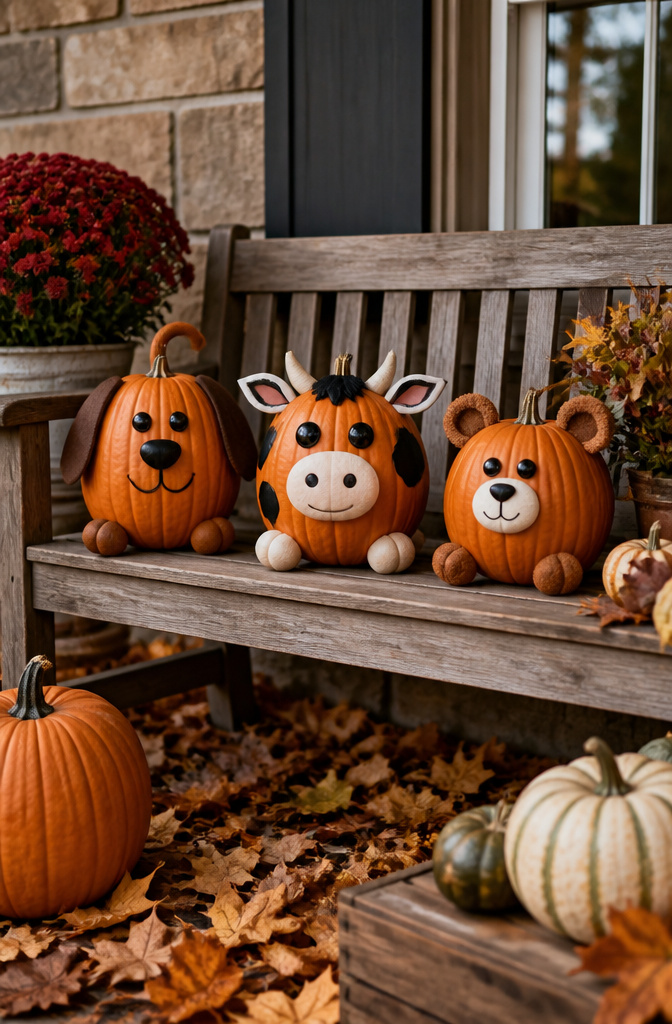
A pumpkin makes a surprisingly good body for a cow, dog, or any animal you want on the porch. The round shape already does most of the work; you just need to build the rest from craft foam or fabric scraps and let the pumpkin be what it is.
Ears, snouts, and tails attach with hot glue, which is the only adhesive that sets fast enough while you are holding a floppy ear in place. Googly eyes do the heavy lifting on expression, so buy the kind with a strong adhesive backing or add extra glue. I have watched a carefully coiled cord eye slide down a pumpkin by morning because the morning dew weakened the bond.
For a cow, oval fabric ears layered onto larger burlap pieces give the right flop, and a long fabric strip forms the nose. A dog needs narrower ears and a snout that projects forward rather than hanging, which foam cuts and folds to shape easier than fabric will. The tail can be a simple braided cord or a pipe cleaner curled into a question mark.
The limit is weight. Anything too heavy pulls the glue away from the pumpkin skin as it dries and shrinks. Keep the elements light, attach them in stages so each layer has time to set, and expect to replace a googly eye or two by November.
17. Storybook Character Pumpkins
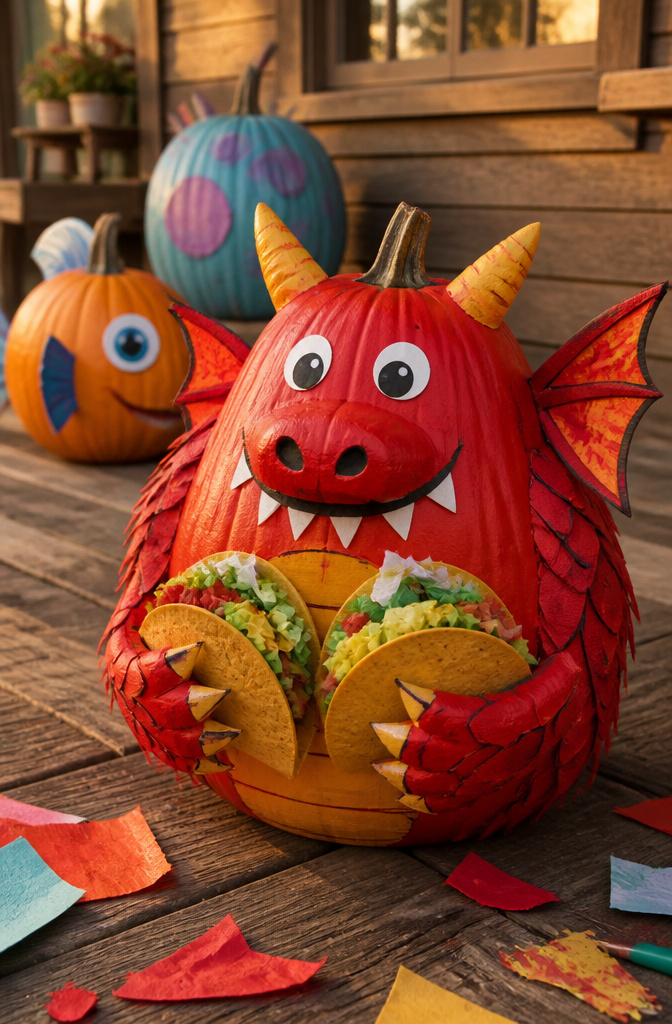
Storybook character pumpkins take more planning than slapping on geometric shapes, but the payoff is a front porch that stops a four-year-old in their tracks. I saw a Dragons Love Tacos build that used cardboard sprayed red for the dragon’s body, card stock folded into tacos, and popsicle sticks hot-glued to the neck and tail so they slid into slits cut in the pumpkin bottom with an X-ACTO knife. The whole thing sat stable without any internal armature. A butternut squash works better than a pumpkin for upright characters if the shape fits, like the Dog Man someone built with stuffed felt ears and a hat made from blue fabric wrapped around a form and glued. For Finding Nemo, the rounded pumpkin body already matches the fish shape, so you’re mostly adding fins and facial details rather than fighting the gourd’s geometry. The extra hour of sketching matters here: a lopsided dragon becomes charming, but a lopsided Nemo just looks like a mistake you made.
18. Button Spider Pumpkin
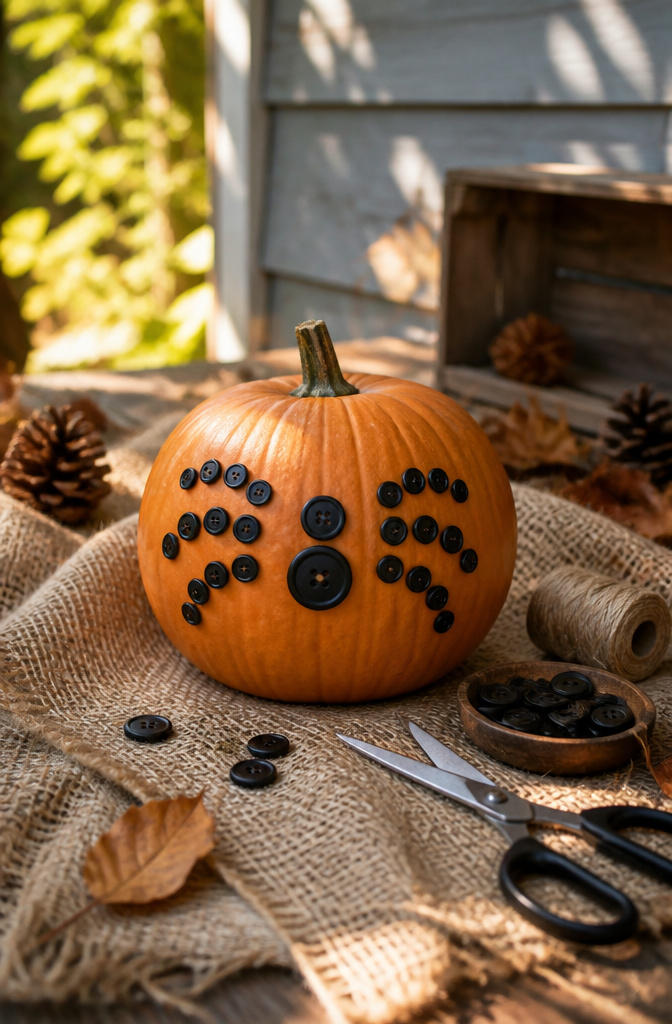
Buttons make the most of a pumpkin’s flat sides. Thread red string through the holes first if you want that black-widow mark; otherwise, plain black buttons glued in a loose cluster build the body in minutes. Pipe cleaners or wire bent at the knees and poked into the rind finish the legs without any carving. The pumpkin’s own orange reads as ground, not decoration, so the spider shape stays readable from the sidewalk. I have used this on smaller pie pumpkins where a carved face would collapse the thin walls, and the whole thing costs whatever a handful of thrift-store buttons and a dollar-store pipe cleaner pack run. The limit is the curve: buttons slide downhill on round heirloom varieties, so set them on the flattest face and let the geometry do the holding.
19. Thumbtack Pumpkin
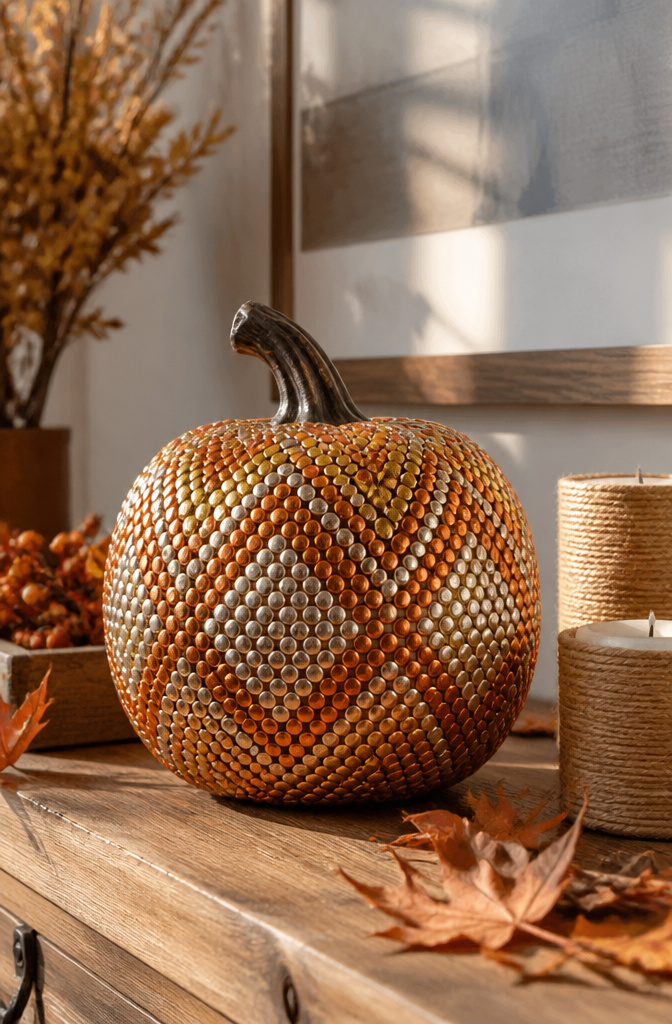
Colored thumbtacks push straight into a pumpkin’s rind to make a studded, textured surface that catches light like nothing paint can do. The metal tacks stay put through wind and rain better than any adhesive-backed embellishment, so this decoration holds up on a porch through the whole season without touch-ups. A single letter or simple shape reads cleanly from a distance; covering the whole surface in gold tacks gives a dense, almost armored look that outlasts spray paint on synthetic pumpkins. Office supplies beat craft-store adhesives for weather resistance. The only real limit is patience, since each tack goes in by hand, but that same effort means the design stays exactly where you put it.
20. Doodle Pumpkins
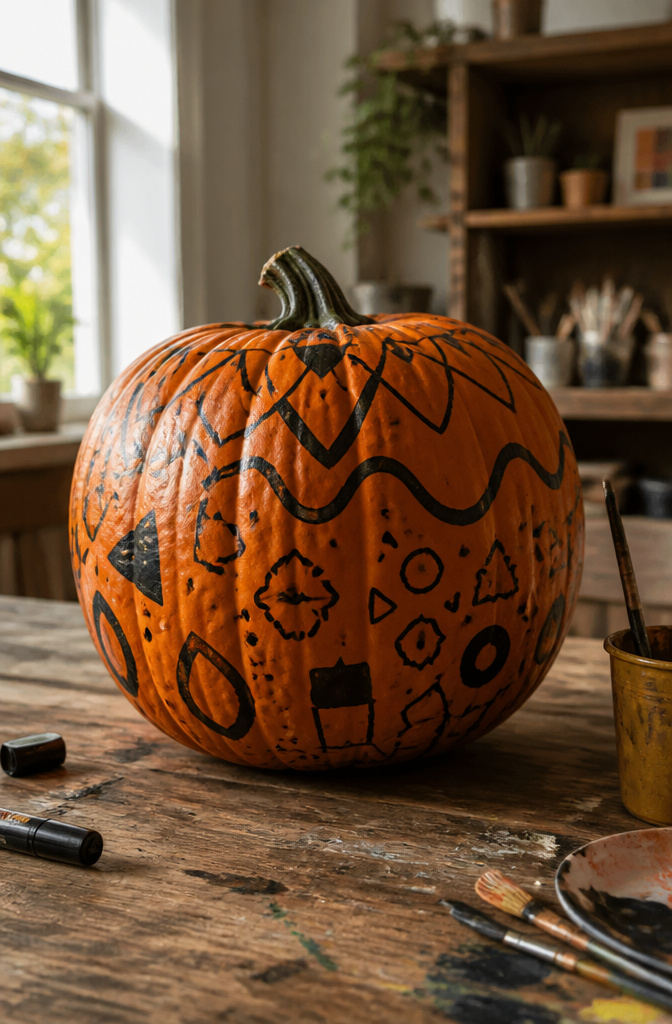
A pumpkin with a Sharpie in hand is the fastest way to get something that looks like you made it, not like you bought it at the grocery store. The barrier is basically zero: the pumpkin is already orange, the marker is already in the junk drawer, and the design lives or dies by your own line rather than a template. I like paint pens for this more than regular Sharpies because the ink sits on the waxy skin instead of soaking in and feathering, but a thick black marker still works if you press lightly and build the line in two passes.
Monochrome designs hold up best. Outlines, crosshatching, simple faces, or geometric blocks all read clearly from across a porch. Color demands more planning and a steadier hand, and the pens run dry faster than you’d expect on a surface this absorbent. A thick black outline and filled shapes will look intentional even when the drawing itself is shaky, which matters at 9 PM on a Sunday when the pumpkin still needs to be on the steps by Monday.
Frequently Asked Questions
What are some easy pumpkin decorating ideas?
Painting, stickers, and mummy wrapping are the simplest ways to dress up a pumpkin without much mess or skill. Handprint pumpkins with acrylic craft paint make keepsakes with kids, while sticker faces take under five minutes and peel off clean for reuse. Gauze strips and a glue stick turn a small pumpkin into a mummy in about twenty minutes, with kids doing most of the wrapping themselves.
How can I decorate a pumpkin without carving it?
Paint, fabric, stickers, and thumbtacks all work on intact pumpkins and keep them from rotting too fast. The article covers twenty no-carve methods including puffy paint textures, Mod Podge tissue paper layers, black fishnet stretched for a gothic web effect, and colored thumbtacks pushed straight into the rind for a studded surface that survives wind and rain. Faux pumpkins work for almost every technique if you want the design back next fall.
What materials do I need for pumpkin decorating?
Acrylic craft paint, paint pens, Sharpies, a hot glue gun, Mod Podge or clear sealer, craft foam, googly eyes, ribbon, fabric scraps, adhesive stickers, pipe cleaners, and mini pumpkins cover most projects. For specific builds you might add puffy paint, tissue paper, gauze, gold leaf and adhesive size, buttons, thumbtacks, or succulents and potting soil. Leftover house paint and office supplies like thumbtacks work as well as craft-store buys.






