I’ve found that WD-40’s Smart-Straw spray penetrates stuck faucet handles effectively, loosening corrosion in minutes without requiring plumber calls.
It dissolves stubborn mineral buildup with light scrubbing and creates a protective moisture barrier on chrome and stainless steel.
The key is to spray, wait a few minutes, then wipe away excess to prevent drips.
While it’s effective for quick fixes and rust prevention, water eventually washes it away, so regular reapplication keeps your fixtures running smoothly.
Learn exactly how to apply it correctly and when replacement might be the better choice.
How WD-40 Works on Faucets and Handles
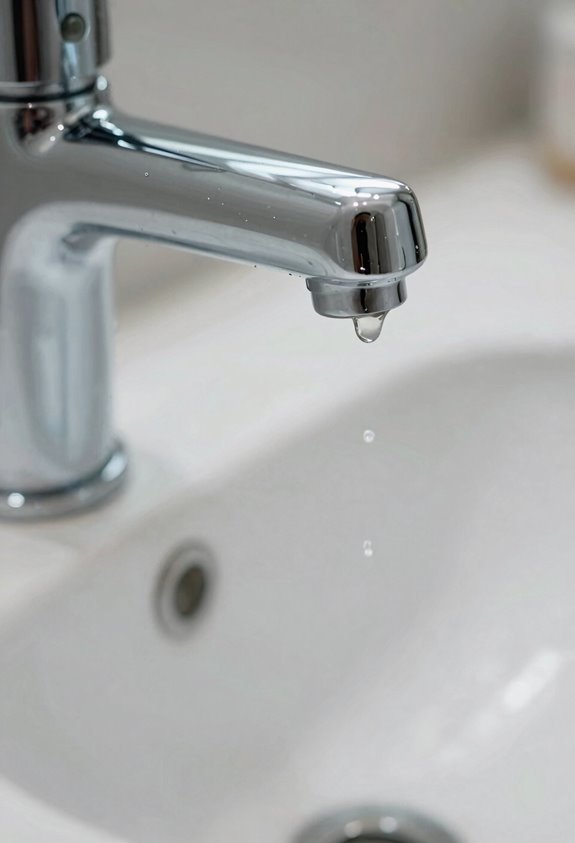
Ever wondered why your faucet handle feels stiff or squeaks when you turn it? WD-40 works on faucet hardware by penetrating tight joints and reducing friction between moving parts. Your handle will glide smoothly instead of sticking. The lubricant also tackles mineral buildup and corrosion that slows everything down.
A light spray on faucet joints makes a noticeable difference. The Smart-Straw precision stream lets you target exactly where you need it most. After applying, wipe away excess with a cloth so nothing builds up on your chrome or stainless surfaces. Regular lubrication keeps your faucet operating quietly and rust-free.
What WD-40 Can Actually Fix
I’ve found that WD-40 addresses three major faucet problems you probably face at home: it stops rust from eating away at your metal fixtures, it loosens stuck handles and components that won’t budge, and it creates a protective shield on exposed metal surfaces so corrosion can’t take hold. When I spray a light coat on my bathroom faucet’s joints and hinges, then wait just a few minutes, that stiffness practically melts away. You’re getting a product that prevents future problems while fixing the ones you’re dealing with right now.
Rust Prevention On Fixtures
Since bathrooms are naturally humid environments where moisture constantly attacks metal, your faucets and shower heads face corrosion challenges. WD-40 Multi-Use Formula can protect your fixtures effectively. A light spray followed by a quick wipe creates an invisible moisture barrier that shields metal surfaces from dampness that causes deterioration. After showers or exposure to humidity, apply a thin coat to bathroom hardware and outdoor faucets. The key is wiping away excess to avoid buildup while maintaining that protective layer. Incorporate this into routine maintenance to prevent rust before it starts. Your fixtures will stay cleaner and more resilient throughout the year.
Loosening Stuck Components
When you’re facing a corroded bolt that won’t budge or a showerhead frozen in place, WD-40 Multi-Use Formula breaks up oxidation and corrosion on bonded parts, loosening stuck components without damaging surrounding surfaces.
WD-40 effectively removes corrosion through these methods:
- Pre-soak fasteners before tackling them, softening corrosion and easing removal with less effort
- Use Smart-Straws or Precision Pens for targeted spraying around threads and stubborn joints
- Let it sit a few minutes before retrying with your wrench for better results
- Prevent galling when reassembling, ensuring smoother future disassembly
Spray around faucet threads, wait briefly, then retry with your wrench. This approach successfully frees fixtures that resist initial removal attempts.
Protecting Metal Surfaces
Beyond loosening stuck parts, WD-40 creates a protective shield on your metal surfaces. This formula works as a guardian for your faucets and fixtures. When you spray it on and wipe away the moisture, you’re building a thin, invisible barrier that stops corrosion before it starts. Oxidation loosens on tools and hardware that’s been battling humidity. For stainless steel, reapply after cleaning to keep that moisture-repelling film fresh and strong. Your bathroom fixtures stay shinier longer when you maintain this protection regularly. Controlling rust in your homes requires consistent application, and WD-40 provides an effective solution without unnecessary complexity.
Loosen Corroded Faucet Handles
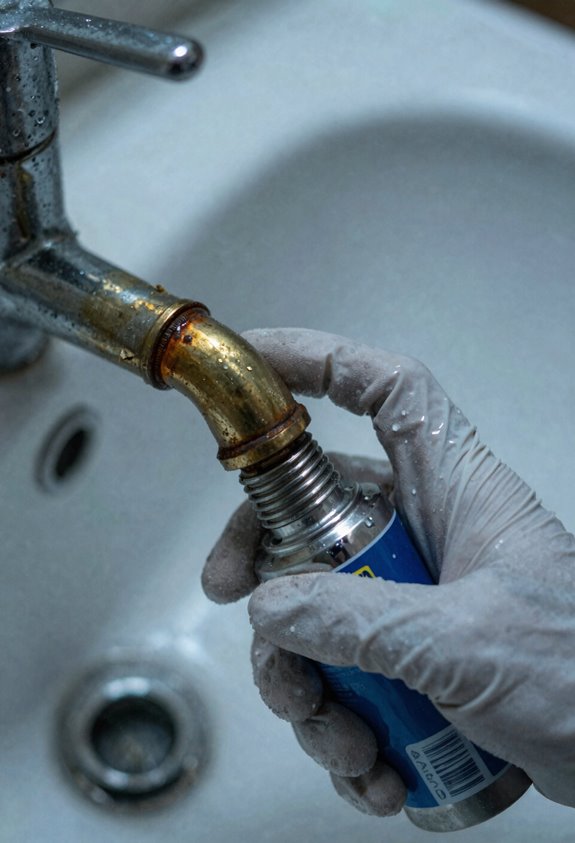
Over time, bathroom moisture and mineral deposits create stubborn rust that locks up your faucet handles, making them nearly impossible to turn. WD-40 Multi-Use Formula effectively cuts through corrosion.
Bathroom moisture and mineral deposits create stubborn rust on faucet handles. WD-40 Multi-Use Formula effectively cuts through corrosion.
To loosen corroded handles:
- Spray WD-40 directly onto the handle pivot and connecting hardware
- Let it sit for a few minutes to penetrate the rust
- Gently work the handle back and forth to break up oxidation
- Wipe away excess lubricant to prevent drips
No disassembly is required. This approach works effectively for even heavily corroded faucet handles. After loosening everything up, retighten the fittings to restore proper water control. Reapply WD-40 periodically as maintenance to keep bathroom fixtures functioning smoothly.
Dissolve Hard Water Mineral Buildup
While loosening stuck handles gets your faucet moving again, you’ll probably notice something else that’s been bothering you: those stubborn white, chalky deposits and greenish crusts coating your chrome and steel surfaces. WD-40 is an effective solution against hard water mineral buildup.
A light spray directly on affected areas breaks down mineral scale quickly. Wait a few minutes, scrub lightly, then rinse thoroughly with warm water. This process dissolves the buildup that’s been making your faucet look dull and tired.
| Before WD-40 | After WD-40 | Your Results |
|---|---|---|
| Chalky white deposits | Sparkling clean | Restored shine |
| Greenish crusts | Vanished completely | Like-new appearance |
| Dull, tired look | Brilliant finish | Fresh, renewed faucet |
| Mineral-heavy surfaces | Smooth metal | Professional-looking bathroom |
| Frustration | Pride | Belonging to the fix-it crew |
Repeat applications prevent future buildup, keeping your faucet looking clean and well-maintained longer.
Prevent Freeze-Ups in Cold Weather
As temperatures plummet and winter winds pick up, your outdoor faucets face a serious threat: freezing. WD-40 is an effective option for preventing freeze-ups.
To protect your faucets:
- Spray WD-40 on exposed seals and handles to create a protective moisture barrier
- Apply a light coating to the packing nut and threads on outdoor faucets
- Treat shut-off valves before temperatures drop for smoother winter operation
- Wipe off excess product after cold season to prevent dirt buildup
WD-40 keeps moving parts flexible when it’s brutally cold outside. Faucets operate more smoothly during harsh freezes with this protective treatment. This preventive step avoids costly repairs and frozen fixtures.
Protect Chrome and Steel From Rust
Why do your bathroom fixtures lose their shine so quickly? Moisture and humidity are the culprits. WD-40 is effective for rust prevention on chrome and steel fixtures. Spray a light mist of WD-40 directly onto faucets, shower heads, and handles, then wipe away the excess with a cloth. This creates a protective barrier that reduces rust formation significantly, especially in damp bathrooms. Apply it regularly, about once monthly, and your fixtures will stay brilliant and corrosion-free.
WD-40 works for chrome protection because it drives out remaining moisture after cleaning. This simple routine keeps your bathroom looking pristine while extending your fixtures’ lifespan considerably.
How to Apply WD-40 Safely
Ready to give your faucet proper maintenance? This guide covers the safest WD-40 application methods for your faucet lubrication routine.
Here’s what works best:
- Spray lightly on hinges and moving parts using WD-40 Multi-Use Formula to reduce squeaks
- Use the Smart-Straw precision stream for hard-to-reach areas without messy overspray
- Wipe excess with a cloth after application, then run water to distribute the lubricant evenly
- Avoid hot components and electrical elements; apply only to metal joints as directed
This approach creates a protective barrier against corrosion in humid bathrooms. The key is restraint; you’re not drenching anything, just strategically targeting where your faucet needs help. After wiping again, you’ll notice smoother operation and squeak-free performance.
Keep WD-40 Away From Drinking Water
While WD-40 works wonderfully for keeping your faucet moving smoothly, you need to know this critical fact: it absolutely cannot go near your drinking water.
WD-40 safety requires protecting your family from drinking water contamination. You must keep this lubricant far away from any water lines or fixtures connected to your tap. Here’s why it matters:
| Risk | Solution |
|---|---|
| Spray enters water lines | Use approved plumbing products only |
| Accidental faucet contamination | Flush system thoroughly with clean water |
| Cross-contamination occurs | Store WD-40 away from water areas |
| Health concerns arise | Consult safety guidelines immediately |
| Potable water protection fails | Choose certified water treatment chemicals |
Use WD-40 strictly for lubrication outside your drinking water system. Contamination of household water supplies can cause serious health problems and requires immediate professional intervention.
Why WD-40 Is Only a Temporary Fix
That smooth faucet feeling you get after spraying WD-40 won’t last forever. I’ve learned this the hard way, and I want to save you from the same frustration.
Here’s why WD-40 is only a temporary fix:
- Water washes it away – The lubricant doesn’t stick around long since water constantly flows through your faucet
- Underlying issues remain – Corrosion and worn parts stay broken underneath that temporary relief
- Dust and grime accumulate – Over time, WD-40 attracts debris that reduces performance
- You’ll need repeated applications – That smooth feeling requires constant respraying, masking real problems
We’re treating symptoms, not causes. For lasting solutions, you’ll need replacement parts or descaling instead of relying on quick fixes. Addressing the actual problem saves time and money.
When a Plumber Should Replace Your Faucet Instead
While WD-40 works wonders for minor drips, sometimes your faucet needs to be replaced entirely. You’ll want to recognize the telltale signs of irreparable damage: persistent leaks after multiple WD-40 applications, pooling water around the base, or corrosion that’s eaten away at the faucet body. These conditions indicate the underlying seals and valve seats are too worn for quick fixes. Understanding the cost-benefit analysis and knowing what professional replacement involves will help you make the right decision for your home.
Signs of Irreparable Damage
Sometimes you’ll discover that WD-40 and fresh seals can’t save your faucet. Recognizing irreparable faucet damage helps you avoid wasting money on endless repairs. Here’s what tells you it’s replacement time:
- Persistent leaks and corrosion around the cartridge that WD-40 can’t fix
- Cracked spouts or body seams that worsen despite multiple seal replacements
- Repeated expensive repairs like multiple cartridge replacements with diminishing water pressure
- Deep rust, mineral buildup, or structural cracks from impact damage
When your faucet shows these signs, replacement is more cost-effective than continuing repairs. Accepting this reality prevents water damage to your home and eliminates ongoing repair expenses.
Cost-Benefit Analysis Breakdown
Once you’ve accepted that your faucet might be beyond saving, the next step is figuring out whether repair or replacement actually makes financial sense.
This decision requires a careful examination of your budget. When repair costs hit 50-70% of a new faucet’s price, replacement wins every time. Consider this breakdown:
| Factor | Repair | Replacement |
|---|---|---|
| Labor Time | 1-2 hours | 1-3 hours |
| Parts Cost | $50-200 | $150-500 |
| Hidden Damage | Possible | Solved |
| Warranty | Limited | Full coverage |
| Lifespan Gained | 2-3 years | 10+ years |
When temporary fixes like WD-40 fail and leaks reoccur, replacement becomes the smarter choice. Modern faucets improve water efficiency and prevent under-sink corrosion that compounds costs. Your cost-benefit analysis should include expected lifespan; replacement provides 10 or more years of service compared to 2-3 years from repair.
Professional Replacement Best Practices
If your faucet keeps leaking even after you’ve tried fixes like WD-40 and temporary repairs, it’s time to call in a professional. Replacement is often the best solution. Knowing when to replace beats endless repair cycles.
Professionals consider the following factors for faucet replacement:
- Persistent leaks that WD-40 can’t fix or internal corrosion spreading through your pipes
- Cost comparison: when multiple repairs approach new faucet prices, replacement wins
- Hidden damage behind walls or corroded supply lines requiring code-compliant work
- Worn cartridges in single-handle units that fail repeatedly after servicing
Your plumber will shut off water supply, test everything post-install, and verify your mounting configuration works perfectly. Professional installation ensures your faucet operates leak-free for years.
Mistakes That’ll Make Things Worse
When you’re eager to fix your faucet with WD-40, it’s easy to accidentally do more harm than good. Soaking your faucet backfires because excessive spray leaves sticky residue that attracts even more grime than before. Don’t spray directly into the water stream or onto moving parts; you’ll contaminate your drinking water system, which isn’t worth the risk. The biggest mistake people make is treating WD-40 as a permanent solution. It’s lubrication, not a sealant, so it can mask serious valve wear underneath. You’ll think you’ve fixed the problem when you’ve really just hidden it. Always rinse thoroughly with warm water afterward and wipe away excess product. Skipping this step creates that annoying sticky buildup you’re trying to avoid.
The Right Application Steps
I’ve found that nailing the spray technique and timing makes all the difference when you’re getting WD-40 into your faucet. Use short, light bursts from the Smart-Straw to hit those tricky joints and handle connections, then wipe everything down with a cloth right away to prevent a greasy mess. After you’ve applied the lubricant, run the faucet for a few seconds to distribute it properly and remove any leftover residue. This prevents buildup and keeps your faucet operating smoothly.
Spray Technique and Timing
How you spray WD-40 on your faucet affects the quality of your results. Precision matters when using this maintenance tool.
Proven spray technique:
- Shake the can thoroughly before applying
- Hold the Smart-Straw nozzle 6–8 inches from your faucet
- Use short, controlled bursts rather than heavy spraying
- Let the product sit for 1–2 minutes before wiping
Timing is equally important. Avoid spraying directly into water flow; focus instead on joints, threads, and valve stems. After waiting those minutes, wipe away excess with a cloth and rinse with water. For stubborn mineral buildup, apply WD-40 again, wait longer, then wipe and rinse. This maintenance routine prevents corrosion and keeps faucet components operating smoothly.
Wiping and Rinsing Process
Once WD-40 has had a minute or two to work, you’re ready to wipe away all that stubborn grime and mineral buildup. Grab a soft cloth and gently wipe the faucet surface, watching the loosened deposits disappear. For stubborn hard water stains, spray WD-40 directly on them, wait a few minutes, then wipe clean and rinse thoroughly with warm water. After wiping, go over the faucet again to remove any remaining film that could cause streaks or slippery spots.
| Step | Action |
|---|---|
| 1 | Spray WD-40 on faucet |
| 2 | Wait 1-2 minutes |
| 3 | Wipe with soft cloth |
| 4 | Rinse with warm water |
| 5 | Final wipe for shine |
This process removes mineral deposits and hard water stains, leaving your faucet clean and safe to use.