I’ll start by checking that care label, your roadmap. If your covers are removable, I separate them from inserts and machine wash on delicate with mild detergent.
For non-removable covers, I spot-clean weekly with a damp cloth and gentle soap.
Pre-treat any stains by letting them soak ten to fifteen minutes first.
Line-dry everything completely before reassembling.
Regular maintenance every month keeps pillows fresh and odor-free, extending their life.
Check Care Labels First

Why should you start with the care label? It’s your best resource when cleaning sofa pillows. This step is important because it tells you exactly what your pillow covers can handle. Look for those helpful symbols: a washing tub means machine washing is okay, while a circle or diagonal line signals dry cleaning or no washing allowed.
Before you toss anything in the washer, read every instruction carefully. The label reveals whether you’re washing just the pillow covers or the inserts too, plus it specifies temperature and cycle settings. Machine washing requires following these guidelines precisely to avoid shrinking or fading. When labels restrict washing, switch to hand washing or spot cleaning instead. Following these care labels preserves the condition of your pillows over time.
Removable vs. Non-Removable Covers: Choose Your Path
Now that you know what your care label allows, it’s time to figure out whether your sofa pillows have removable covers. This determines your entire cleaning strategy.
If your pillows have removable covers, you can wash them separately from the inserts using machine washing on a quick cycle with mild detergent and an extra rinse. Pre-treat stains first, then line dry completely before reassembling.
For non-removable covers, use spot cleaning instead. Apply a fabric-safe upholstery cleaner, blot gently, and vacuum before and after cleaning.
Understanding your pillow type ensures you select the appropriate cleaning method to maintain your sofa’s appearance.
Pre-Treat Stains Before Washing
Before washing sofa pillows, identify the stain type—whether grease, food, or something else—since different stains require different solutions. Apply the appropriate pre-treatment product using a white bar mop towel with gentle soap on a damp cloth, pressing lightly against the spot to work the solution in deep. Let it soak for a bit so the stain can loosen up before you rinse and blot it away.
Identify Stain Types First
Getting those stubborn stains out starts with figuring out exactly what you’re dealing with. Understanding stain types is essential because each one responds differently to treatment. Before you pre-treat anything, you’ll want to identify which category your stain falls into:
- Water-based stains like juice, coffee, or mud
- Oil-based stains such as grease or butter
- Dye transfer stains from ink or colored materials
- Mystery stains that you can’t quite identify
Once you’ve pinpointed your stain type, you can tackle it effectively. Always check your pillow’s care label first; it’s your roadmap for safe cleaning. This identification step saves you time and prevents damage to your pillows.
Apply Pre-Treatment Solutions
The magic happens in those essential minutes before you toss your pillows into the wash. Stain pre-treatment is effective for getting your pillows looking fresh again.
Here’s what to do: Apply a gentle detergent mixed with water onto a damp cloth, then blot the stain gently. Never scrub. For removable covers, use a laundry detergent spray, applying about five sprays per load for effective cleaning. If your pillows have fixed covers, upholstery cleaning solutions specifically designed for fabrics work best.
Before treating the whole stain, always spot test on a hidden corner first. This simple step protects your pillows from color damage or fabric harm. Once you’ve pre-treated and checked for colorfastness, proceed with your chosen washing method according to care labels. This approach delivers reliable results.
Allow Time For Soaking
Once you’ve blotted that stain, letting your pre-treatment soak is essential for lifting out stubborn marks. I always give my treatments 10-15 minutes to work into the fabric fibers.
Here’s why soaking matters:
- Breaks down dirt particles so they release from fabric more easily
- Penetrates deep into stains that surface cleaning can’t reach
- Maximizes your cleaning power before you wash or scrub further
- Saves you from harsh scrubbing that damages delicate upholstery
While that treatment sits, check your care label and plan your next move. After soaking, rinse or wash according to fabric requirements. Thorough drying afterward prevents moisture problems, especially with foam cushions. This soaking step significantly improves your cleaning results.
Machine Wash Removable Pillow Covers
Most removable pillow covers can be machine washed, and this is one of the easiest ways to keep your sofa looking fresh. Separate the pillow covers from their inserts first, then toss them into your washing machine with warm water on a delicate cycle. Add mild detergent and an extra rinse to ensure thorough cleaning. If your machine has an agitator, balance your load carefully; front-loading machines without agitators work best. Before reassembling everything, line-dry the covers completely. This prevents shrinkage and maintains their appearance. Always check care labels though, because some fabrics need dry-cleaning instead. Your sofa pillows will feel renewed after this cleaning method.
Hand-Wash Delicate Fabrics and Special Materials
I’m excited to show you how to handle those gorgeous silk and wool pillows, because they’re absolutely worth the extra care they demand. First, you’ll learn to spot which fabrics need gentle hand-washing versus dry-cleaning, and then we’ll walk through the best techniques to keep them looking brand new. You’ll also discover the smartest drying methods that protect these delicate materials without causing shrinkage or damage.
Identifying Special Fabric Types
Have you considered why some pillow fabrics need completely different care than others? Identifying fabric types is essential before washing.
- Silk and wool require dry-cleaning only; water damages them significantly
- Suede and leather need non-water cleaning methods exclusively
- Down-filled pillows often require professional dry-cleaning for best results
- Non-washable fabrics need spot-cleaning with mild detergent instead of full submersion
Always check the care label first, as manufacturers include vital guidance there. When you spot a “non-washable” label, use a fabric-safe cleaner and gentle cloth instead of dunking the pillow. Understanding these fabric types protects your investment and preserves the pillow’s color, texture, and shape by respecting what each material requires.
Hand-Washing Delicate Materials
Once you’ve confirmed your pillows are hand-washable, you’re ready to give them gentle care. Start by spot-testing a small, inconspicuous area with a white towel to check for colorfastness. This step prevents color bleeding.
Next, fill a basin with lukewarm water and add mild detergent to create a solution suitable for delicate fabrics. Gently submerge each pillow and softly squeeze the soapy water through the material without wringing, as this could damage delicate fibers. After rinsing thoroughly with clean water, press out excess moisture using a towel.
Finally, lay your pillows flat to air dry away from direct heat or sunlight. This method preserves their shape and prevents deterioration from heat exposure.
Drying Techniques for Delicates
Now that your pillows are freshly cleaned, getting them dry the right way is absolutely essential. This is where a lot of people make mistakes.
Here’s what I recommend:
- Air-dry completely in a well-ventilated space away from direct sunlight
- Avoid heat sources like dryers, which can damage delicate fabrics
- Reshape foam inserts gently while still slightly damp
- Hang pillows or lay them flat for even moisture distribution
Thorough drying prevents mold and moisture retention that will ruin your work. Delicate pillows typically require 24-48 hours to dry completely, depending on humidity levels. They’re ready when completely dry to the touch.
How to Wash Foam Pillow Inserts by Hand
Why should you treat foam inserts separately from your pillow covers? Foam requires special care due to its delicate nature. I hand wash my foam pillow inserts in a large sink or tub using warm water and a small amount of mild detergent. This gentle approach protects the foam from the damage that machine washing would cause.
My process involves three key steps: First, I cleanse the foam carefully, then rinse thoroughly until all soap residue disappears. Next, I gently squeeze out excess water without wringing or twisting, which can deform the material. Finally, I air dry the inserts completely before reassembling.
This hand-washing method keeps your foam pillows fresh and supportive for years. The technique effectively preserves foam quality while maintaining cleanliness and comfort.
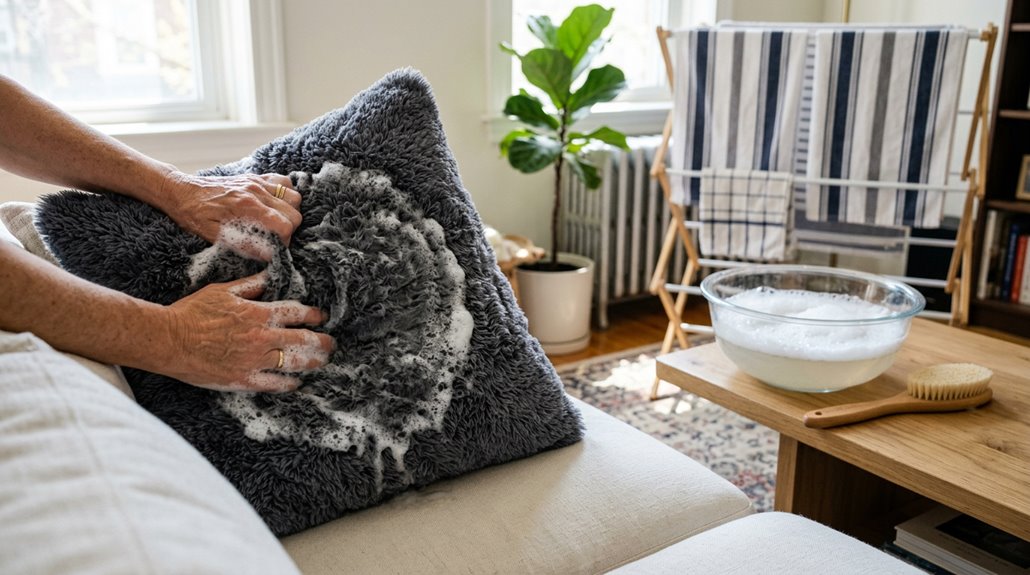
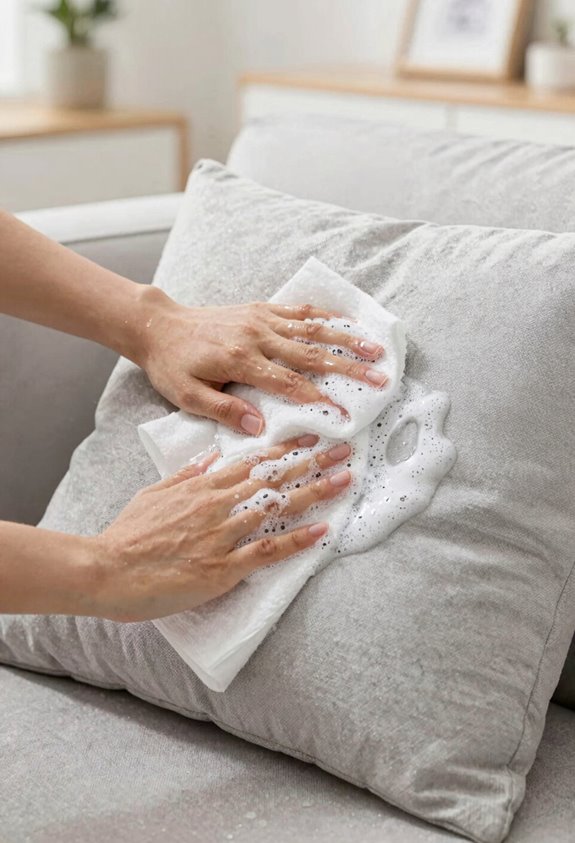
Spot-Clean Non-Removable Covers Without Damage
What’s the best way to tackle those stubborn stains on pillows you can’t unzip? Spot-cleaning non-removable covers is completely doable when you follow these smart fabric care steps.
Here’s my go-to approach for pillow stains:
- Spot-test first in a hidden corner to ensure no color transfer or damage occurs
- Use a white bar mop towel with gentle soap on a damp cloth, applying light pressure to lift stains
- Blot thoroughly with a clean towel, avoiding harsh scrubbing that frays fabric
- Rinse completely to remove all soap residue and prevent further staining
Always work gently because these covers deserve respect. If you need deeper cleaning, steam works great. Just check your fabric care label first and never oversaturate.
Steam Clean Set-In Stains on Upholstered Covers
When spot-cleaning alone isn’t sufficient, steam cleaning becomes an effective solution for stubborn stains that resist other methods. A handheld steamer loosens set-in stains on upholstery without harsh chemicals.
Hold the steamer at a distance and use sweeping motions to gradually lift the stain without oversaturating your fabric. Before you start, always test steam on a hidden area first to avoid color bleeds or shrinkage.
After steaming, blot everything with a clean white cloth to absorb loosened debris and moisture. For particularly persistent stains, combine steam with mild fabric cleaner applied via sponge, then re-steam and dry completely. Your pillows will look refreshed and feel restored.
Air-Dry Removable Covers and Foam Inserts
Once you’ve tackled those stubborn stains, the drying phase is essential. Proper drying prevents mold and musty odors. For your removable covers, lay them flat or hang them in a well-ventilated area until completely dry, which typically takes 24-48 hours depending on humidity. Your foam inserts require the same attention. Hand-wash just the exterior, then let them air dry thoroughly in a spot with good airflow before reassembling.
Line Drying Covers Properly
After you’ve cleaned your sofa pillow covers and foam inserts, the drying stage is crucial because improper drying can trap moisture inside and create mildew or damage your pillows. Line drying provides the best moisture control and protects your fabrics.
To ensure your pillow covers dry properly:
- Place covers on a completely dry, flat surface or hang them upright
- Choose a well-ventilated area away from direct sunlight to prevent color fading
- Check regularly for full moisture control with no damp spots remaining
- Keep covers separated so air circulates freely around all sides
This approach protects your investment and keeps everything fresh for reassembly.
Air Drying Foam Inserts
How’s your foam looking after that wash. Next, air dry your foam inserts. After washing pillows thoroughly, you’ll want to gently squeeze out excess water without wringing them like a towel. Air drying preserves your foam’s shape and integrity. Lay those foam inserts flat or hang them in a well-ventilated space where air can circulate all around them. Skip the dryer completely, as heat will damage your foam and create misshaping that’s difficult to reverse. Let them dry completely before reinserting them into covers. Complete air drying typically takes a day or two, after which your pillows will provide years of comfort and support.
Prevent Mold: The Complete Drying Process
Why is drying your cushions completely so important? Moisture trapped deep inside cushion interiors creates the perfect environment for mold growth, which you’ll want to avoid.
Moisture trapped inside cushions creates the perfect breeding ground for mold—complete drying is essential to prevent it.
Your complete drying process:
- Air dry cushions thoroughly in a well-ventilated area, which is your safest option for mold prevention
- Use a no-heat fluff cycle with dryer balls to reshape while releasing moisture
- Check interior dryness before reassembling by pressing the center to ensure no dampness remains
- Avoid high heat, as it damages fills and defeats your mold prevention efforts
Give your cushions extra time to dry completely rather than rushing the process. Thorough drying prevents mold growth, extends your sofa’s lifespan, and maintains your home’s air quality. Washable cushions that dry completely remain safe and fresh.
Keep Pillows Fresh Between Washes With Baking Soda
Want to keep your sofa pillows smelling fresh without waiting for wash day? Baking soda works well for upholstery cleaning. Use this method: first, vacuum your pillows thoroughly to remove surface dirt. Then, sprinkle baking soda evenly across the fabric and let it sit for 20–30 minutes. The baking soda neutralizes moisture and tackles light stains, providing effective odor control between washes. Finally, use your vacuum’s upholstery attachment to remove all remaining residue completely. This quick refresh keeps your pillows fresh and inviting without full washing. Regular use of this technique maintains that clean appearance and smell.
Fluff and Reshape Pillows After Drying
Once your pillows are completely dry, it’s time to restore them with gentle fluffing and reshaping. Restoring pillow loft improves your seating experience and gives pillows a fresh feel.
Restore pillow loft through gentle fluffing and reshaping to improve your seating experience and refresh their appearance.
For effective drying and fluffing results:
- Hand-fluff by gently patting and shaking between passes to prevent lumping
- Use a no-heat dryer setting with dryer balls or clean tennis balls for even filling distribution
- Pat and reshape the cover after reassembling to eliminate residual bunching
- Ensure foam inserts are completely dry before putting covers back on
The bounce back fabric care makes a measurable difference. Your pillows regain their original shape and support, restoring their appearance and comfort. This final step keeps your seating plump and welcoming for regular use.
Reassemble Covers and Inspect for Residual Odors
How does your pillow smell right now?
Once your pillow covers and inserts are completely dry, it’s time to put everything back together. Carefully slide the dry cover back onto the pillow insert, making sure everything’s snug and secure.
| Step | Action |
|---|---|
| 1 | Confirm complete drying |
| 2 | Slide cover onto insert |
| 3 | Perform sniff test |
| 4 | Address remaining odors |
The odor inspection is the critical final step. Give your reassembled pillow a thorough sniff to check for lingering smells. If odors persist, treat the exterior with fabric-safe deodorizer or sprinkle baking soda, then vacuum after 20 to 30 minutes. For stubborn scents, a brief outdoor airing will eliminate remaining odors. Clean pillow covers require this attention to ensure you sleep on pillows that are fresh and odor-free.
How Often to Wash Sofa Pillows for Longevity
The key to keeping your sofa pillows looking fresh and feeling wonderful is establishing a regular cleaning routine that matches your pillow type. Consistent cushion care makes a difference in how long your pillows last.
Here’s what I recommend for optimal washing frequency:
- Removable covers: Wash monthly to maintain vibrant colors and crisp appearance
- Pillow fillings: Clean every other month at minimum for freshness and shape retention
- Non-removable covers: Spot-clean weekly and vacuum regularly instead of full washing
- Foam inserts: Remove before washing and air dry completely to prevent moisture damage